Monday, December 23, 2024

More 4-strand braiding silliness


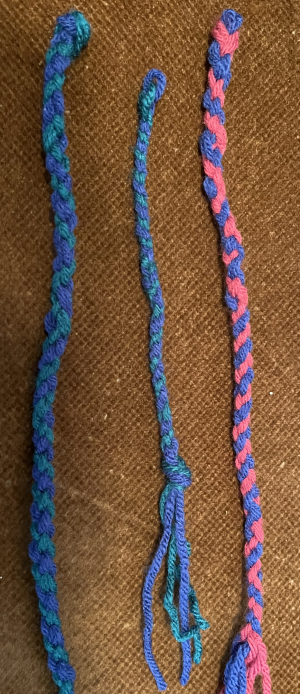
The rightmost braid is the one mentioned in the previous post.  The leftmost braid is a repeat of the fingerlooping methods.  Again, I tried both methods -- move the index finger to the middle finger vs move the ring finger to the middle finger.

They're pretty much identical from a braid structure standpoint -- the index and ring finger on one hand switch clockwise, and the index and ring finger on the other hand switch counterclockwise.  With one, the index finger loop goes over the ring finger loop; with the other, the ring finger loop goes over the index finger loop.

Either one can spiral S or Z; it depends on the arrangement of the colors vs how the loops switch.  Do I remember which is which?  Umm, no.  But it was obvious when I'd mess up by switching the twist directions by accident, and then switching back.  I got both S and Z spirals with each of the methods.

Too bad the contrast on the left two braids is so low, because they were very informative.  Both are in green and blue, with the fatter braid being fingerlooped and the thinner one single-strand freehand braided.

The middle one happened after I poked around on the 'net and my own books and stuff.  It's a different method than the other freehand methods I wrote about earlier, though of course they're all kind of the same and it's mostly about the way my brain understands what is going on.

For the middle one -- think of these four elements being arranged in a circle instead of flat.  Instead of 1 2 3 4, we have NW SW SE NE.   As with fingerlooping and disk braiding, we're going to swap NW and SE in one direction, and then swap NE and SW in the other.

So... cross NW over SE, then cross NE over SW.  Twist your wrists and move your fingers (and strands) as appropriate to make sure that the pairs of elements crossing each other don't interfere with the currently-passive elements or vice versa.  As with the other braids, the spiral direction (and color pattern in general) depends on the arrangement of the colors vs the direction of the crossing twists.  One can, of course, cross under rather than over, but for me, the cross-over twist of my fingers felt more natural than the cross-under.

Here's a paracord video that shows it, though with the color arrangement that leads to vertical stripes rather than a spiral: https://www.youtube.com/watch?v=UtWWA6MQXGE and it can also be seen fairly well on Sally Pointer's video (the second braid, starting about halfway through the video): https://www.youtube.com/watch?v=TwVXwH_w2ng

Am I done?  Maybe.  I'm probably not going to explore disk/stand braiding or whipcording because the how-to for those is pretty straightforward.  I am going to try to pay attention to figure out which color arrangements lead to which spiral direction.  It should be pretty obvious pretty quickly.

Whipcording (aka Viking whipcord or interlocking or slinging) -- as far as I know, there's no unambiguous evidence of this method being used before the 17th century.  Honestly, though, whipcording just seems to be doing this braid with wooden bobbins to hold the excess length of unbraided yarn, plus hanging it from something high so it can be worked downwards vertically, plus adding a second person if so desired to make it a game (by tossing pairs of bobbins back and forth).  It would be useful if making long lengths of cord.  But for something that's roughly 8" long, like the Skjoldehamn hood ties?  I'm thinking freehand or fingerloop since either can be done pretty spontaneously.

Dunno if and when I'll explore more 4-strand braiding stuff, such as other braid structures.  I'm also not going to track the history of these braids, because they tend to be pretty universal over time and space, going way way back.  People are clever.

So one possibility for a class is this braid, period.  I could do the fingerloop method and only that.  Or I could do fingerloop and freehand.  Or even fingerloop, freehand, and disk.  It would be in the context of the Skjoldehamn hood ties, with a general discussion of this braid throughout history.

If I did a second class, it would be the 6 strand pigtail-type braid used decoratively on the cuffs, necklines, etc., in the Skjoldehamn outfit, both freehand and fingerlooped.

So ends today's ramblings on this particular 4-strand braid structure.  Maybe.  There might well be an upcoming post on the 6 strand braid and maybe an example of the 4-strand braid showing which color placements lead to which patterns, so my poor little goldfish brain has something to return to later.


Sunday, December 22, 2024

The Skjoldehamn hood braid (some experiments)

I'm still playing around with the braids that were used as ties on the Skjoldehamn outfit.  Today I tried a few things with the 4-element cords that are part of the hood.

Here is a small pic of the hood, screen-shotted from archive.org's copy of the thesis pdf.


And here is a small pic of the ties along with a diagram that traces the path of each element in the braid.


These are both from https://web.archive.org/web/20220225172743/https://kaupafar.com/wp-content/uploads/2022/02/Nye-tanker-om-Skjoldehamnfunnet.pdf with the cords being discussed on p.47-48.

Google translation from the Norwegian text gives the thesis description of these cords as such (somewhat edited): 

"The braid here measures 19 cm including one tassel of 2.5 cm, and is approx. 0.4 cm thick. It is braided from two pairs of S threads in olive green yarn and two pair of S threads in brown-red yarn. The colors wind in spirals (clockwise) down the braid...

"The green tassel is a highly felted/felted weave fabric (of unknown bond) enveloping the outermost part of it. The tassel is sewn on irregular stitches in green Z2S yarn. The round braids are sewn to the hood with both golden and dark grey-brown yarn in Z2S. Since the right side braid is not preserved in its entirety (only 6 cm is preserved) it is uncertain how long this originally was..."

Løvlid seems to think that the ties went under the chin. Other people think that they tied in the back, to adjust the way the hood fit at the back of the head and to keep the top of the hood from flopping forward onto the face.


My first braid (shown in the previous post and also the rightmost braid in the above photo) was done using the above diagram -- outermost thread goes under 2 elements and around 1, first the left than the right.

I did that again today.  (it's the second braid from the right, above)  It's nice but still slightly awkward (though less awkward than the first time).  Then I went poking around on the internet and my books.

It's possible to do this using a disk -- I think it's the very first braid in Rodrick Owens' 250 Braids book.

It's also possible to do this in the opposite way.  Instead of going under 2 elements then around and over, you can go over 2 and around and under.  It didn't seem to be all that much faster than the first method.

But I also found Laverne Waddington's description, which gave me yet another method for making this cord.

Her freehand method  (for 4 cords lined up as 1 2 3 4) is for 2 to cross over 3 and 4, 1 crosses over the cord that is now in the 2 position.   Then, 3 crosses over 2 and 1, with 4 then crossing over the cord that is now in the 3 position.  This is the middle braid in the above photo.  It's a little looser than the previous method, but a lot of that might be because it's the first time I tried it.  There's a nice rhythm to it.

She also showed a fingerlooping method, yay!  She learned it from Hilda in Potosi and Julia, (the post doesn't give further details beyond identifying them as her weaving teachers).  Since the cords on the Skjoldehamn hood are made with 2 strands per element, it is not at all impossible that they were made from fingerlooping.

Here is Waddington's tutorial on both the freehand and fingerloop methods: https://backstrapweaving.wordpress.com/tutorials/tutorial-4-strand-braid/

I first tried the method for spiral-4 braids from Ingrid Crickmore's website, which is a braid that is well known in historic (and modern) fingerloop sources.  Hmmm, close.  That's the second photo from the left.  I'm pretty sure I twisted the loops as I picked them up with the traveling finger.  The braid is pretty loose, which is partly due to using loops instead of single strands of yarn.  Crickmore says that this one needs careful tightening, so I'm sure a lot of it was just me braiding quickly without paying too much attention.

Here are Crickmore's descriptions of the spiral braids: https://loopbraider.com/2019/12/28/spirals-and-2-loops/ and https://loopbraider.com/wp-content/uploads/2019/12/part-2_4-loop_spiralbraid.pdf

Then I tried Waddington's method, which doesn't take any loops through any other loops.  That's it!  I tried a few variations, too, to compare.  This is shown in the leftmost braid.

The fingerloop method that seems to be equivalent to the Skjoldehamn braid is as follows.

Put loops on index fingers and ring fingers.  Have both of Color A on the left hand and both of Color B on the right hand.  (One can get different color patterns by making different choices, of course.)

Shift the loop on the right ring finger to the right middle finger.  Put the loop on the left index finger onto the right ring finger.  Use that left index finger to pick up the loop on the right middle finger.

Then do the other hand.  Shift the loop on the left ring finger to the left middle finger.  Put the loop on the right index finger onto the left ring finger, then use that right index finger to pick up the loop on the left middle finger.

Repeat.

I also tried putting the index finger loop onto the middle finger, then moving the ring finger loop to the other hand, then shifting the middle finger down.  This braid, while perfectly charming, does not give the same pattern.  You can see that in the middle of the braid pictured above.  I also did a little bit of the regular spiral loop (one loop through the other) without twisting the loop, just to double check.

When I was doing it according to the instructions from Hilda and Julia, the braid looks right and is reasonably well-tensioned.

(And now that I'm re-watching the video.....   They walk the loop from the index finger to the middle finger, place the other-hand ring finger loop on the index finger, then put the middle-finger loop on the other-hand ring finger. WELL!  Something new to try, and to see how it compares to what I've been doing.)

All of my braids were relatively short, with pretty much no obvious tension change from start to finish.  Dunno how much of that is because I've been doing this for a while, vs the shortness of the braids, vs the braid structure.

But it seems entirely reasonable that the Skjoldehamn hood ties were made using fingerlooping, with freehand braiding also being a reasonable choice.

A few questions -- the description says that the braids were done from two pairs of S threads.  Were these two single-ply yarns?  Or one plied yarn?  Or two 2-plied yarns?  The picture is fuzzy enough that I can't tell.

I wonder what color these were originally?  Brown-red and olive green could be red and yellow, orange and blue, etc.  Or brown-red and olive green, of course!

What I learned:

There are indeed several ways to do 4 loop fingerloop braids, depending on how one transfers loops from hand to hand.  I knew that about other fingerloop braids I've done, and also about other 4-loop fingerloop braids, but I don't know if I had explored ways to do this kind of braid where loops are only exchanged between two fingers rather than traveling around the entire hand.  I wonder how this will generalize to braids with more elements?  Maybe the Potosi method (on 6 strands) would work for the Hedeby braid?  Hmmm.

There are a lot of ways to make this simple 4-element braid (which I already knew -- this is a very ubiquitous world-wide braid, used in several different textile and textile-related crafts).

There are at least 3 ways to make the braid freehand, and probably several others I haven't explored yet.

Since it is possible, quick, and efficient to make this braid using fingerloop methods, it raises the odds of some or all of the other 2-strand multi-element braids on the outfit being fingerlooped, too.  Of course, they might all have been done freehand.  Or some of each.

Some blog commenters are awfully demanding.  Though tone doesn't come through in writing and some of the commenters write as if English wasn't their first language.  I'll try to be charitable.  Waddington and Crickmore are both unfailingly polite, friendly, and helpful.


I will continue to explore the Potosi and Potosi-inspired fingerloop methods to make sure they give the same structure as well as exploring other variations I might accidentally create.  I should try the disk method (I'd use a marudai if it was me, but if this is a class, they'll probably use disks.  I'll see how much of a pain it is to use an 8-slot disk.).  I'll look through my books and the 'net to see what else I can find.  And I'll make sure the fingerloop method works for the 6-strand Skjoldehamn braids.  I'm nearly positive it does, but heck, I'm nearly positive about a lot of things that turn out to be totally wrong.  

I have plenty of ideas for teaching a class or two.  Or more.

Edited to add -- photo will go in later.  But I tried the Potosi fingerloop method again, both the video version (move index finger loop to middle finger) and my version (move ring finger loop to middle finger).  They have the same kind of structure.  My version is a little tighter.  The video version is a little easier to keep track of in terms of what move needs to happen next.  And the video version spirals Z while my version spirals S.  I'll confirm that tomorrow in case I did something else like mix up the thread color placement.

Saturday, December 21, 2024

A few easy braids from the Skjoldehamn outfit

I'm probably teaching a class next month.  There are several in my rotation already, but maybe I feel like doing something new.

I've seen some interesting six-element braids in the past few months, shown to me by friends.  One is from one of the Sion knitted relic purses.  The purse my friend is knitting has what looks to be a six element square fingerlooped braid.  (I tried making it a few months ago and it seems to look like the pics, so hey, probably a good first approximation.)

Another six-element braid was shown to me by a different friend who is using braids sewn down over seams as a decorative statement, very common in certain times and places.  That friend was using ideas from the Skjoldehamn find and other similar-era finds.

I found a thesis that discussed the textiles of the Skjoldehamn find, including semi-decent pictures and also diagrams of the braids.

And off I go...

Braids are used in several places on this outfit.  The Skjoldehamn hood has a couple of 4-element braided cords used as ties.  Six-element braids are used decoratively around the cuffs and neckline.  A twelve-element braid is used as a belt and something similar is used as a drawstring for the trousers.  Plus ends of other bands are also braided, and possibly more I'm forgetting.

Most of the braids are made using doubled or tripled strands of yarn.  Doubled strands always make me suspect fingerlooping, but there's no obvious evidence (such as braid tightness being different from one end to the other).  So it's possible, but it's also possible the braids are all made in the hand, or by using disks or bobbins/whipcords or something else entirely.

I think the four element and six element braids would be reasonably easy to teach.  So I found my acrylic stash and tried them out.  I used one strand, not double stranded like I believe the originals were.  Also, the originals are made from thin wool yarn and I'm using worsted-weight acrylic.  Plus nevermind about natural dyes vs modern industrial dyes.


The bottom braid in this pic is from the hood.  It's a four-element braid.  I think it's either the same as or very similar to the ones one always sees around the world.

If the four elements are laid out as 1 2 3 4 --  element 1 goes under 2 and 3, then over 3 (to assume the new position 2); then element 4 goes under 3 and 2, and over 2 to become the new position 3.

It's a little awkward to do, so I might try going over-around-under instead of under-around-over to see if that flows better while still looking the same.

The photo of the hood tie in the thesis looks pretty much like my cords, with one end in an overhand knot and the other having loops (or maybe just ends) that are hid by a tassel cover.  Was it fingerlooped?  I'm not sure -- I'll have to see if the structure matches any of the four-element fingerloop braids I know, and then see what it looks like and how easy it is to braid compared to banging it out freehand.

The other two braids have the same structure.  One is more tightly braided and monochrome than the other, but they're identical other than that.  There are six elements.   The right hand outermost element goes over two elements into the middle.  The left hand outermost element goes over three elements (to cross the previous element) into the middle.  Repeat.  I think this type of braid is referred to as a plait, but honestly, I don't really know the current braiding terminology.  I know this one can be done as a fingerloop, but it's plenty fast as a freehand braid.

I also looked at the Hedeby apron braid, mostly because it too is a 6 element braid of a similar time and place.  That one is not fingerlooped, I don't think, since it consists of single stranded elements (of 2-ply wool), not double/triple.  This one has the rightmost element go over 2, and then the left goes under 2 and over the just-moved strand.  It has a more W like appearance (the 6 element plait above has a V like appearance).  I could do the Hedeby 6 element plait in a different class.  It's not much more complicated than the Skjoldehamn 6 element plait.

Here are the references I'm finding useful so far, more or less.  I was given links to youtube videos from my friend using braids as decorative elements over seam lines.   Videos are slow but they can help me confirm that I understand what's going on.  Or at least the video person has the same understanding or misunderstanding that I do.

2009 master's thesis: https://web.archive.org/web/20220225172743/https://kaupafar.com/wp-content/uploads/2022/02/Nye-tanker-om-Skjoldehamnfunnet.pdf

also see https://www.yumpu.com/en/document/read/11552101/skjoldehamn-find-pennsic-expo-conv-svcscom and https://www.medieval-baltic.us/skjold.html (this second link is more for how to make the hood, since it seems a bit different from how most of my friends make it)

Hedeby: https://clothofstars.blogspot.com/2023/08/sca-6-strand-hedeby-braid.html and https://urd.priv.no/viking/smokkr.html#ev-haithabu and of course https://blog.eibeck.de/2014/plait-from-the-hedeby-apron-dress-fragment.html

The videos are from Wyrd Kindred https://www.youtube.com/@WyrdKindred

I think there are more links out there that I've found in the past, and also more links in general.  But the above were of some use today.

Sion purse pic here: https://www.kornbluthphoto.com/SionPurse269.html  The braid really looks like a square 6, which means a square 5 on one hand and a square 7 on the other.  But I'll do more experiments later.  My friend mostly cared about the knitted motifs, which are cute, but which are more well known and studied than the cords.

I hope the above kind of makes sense and helps me figure out what I was thinking about when I went exploring and experimenting today.

One more note to myself -- my friends and I should try making a Skjoldehamn hood according to the methods in the thesis to see how it works compared to the methods my friends currently use.

It's nice to be back creating -- I've been busy these last few months.  What time and ambition I've had for creativity has mostly gone to playing in the kitchen, spinning, knitting, and gardening.

My braiding/weaving area is mostly off limits still, so I might not be able to start a new tablet woven band for another few weeks minimum.


Tuesday, October 22, 2024

Fajum graveyard sleeve fragment tablet-woven trim

'Tis done.


I really like it!

After my last post, I thought about things for a while.  I looked at the photo in the book, and decided that I wanted the band to be symmetric.  So I eliminated the rows that required me to push down on the white.  It's now a 34-row pattern.  And symmetric.

The weaving went fairly smoothly, except when it didn't.  Did I mention that cats are terrible weaving assistants?  Also, if I stopped paying attention, I'd turn something forward when it needed to go backwards, or vice versa, or I'd lose my place and have to figure out where I was.

But it's done and it looks lovely.  There's one teeny little error that no one will notice.  The pattern repeats at the beginning of the band are only subtly different from the rest of the band, so that too won't be a problem.

The band ended up almost 1cm wide.  I had thought it might be 8-9mm but it's in the 9-10mm range, so it is pretty close in size to the original.  It's about 170cm long (66-67" long, 3/8" wide) before blocking.  I did 30 pattern repeats.

I hope the red is stable and nothing leaks onto the white when it gets blocked and washed.  I might get some of that dye-catcher stuff to try to ensure it.  I'll also iron this since it's a little twisty, not surprising given the design. 

I'll probably keep this in my repertoire.  I think it offers a lot of bang for the buck, a very striking design that isn't super-simple but is still straightforward and fairly quick to weave.


Sunday, October 20, 2024

The newest tablet-weaving project (Fajum graveyard fragment)

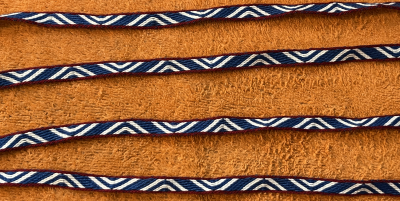
I've been busy with other things these past few weeks.  However, today I started a new band.  As often happens, it wasn't the band I had thought I was going to do next.  It is another one of the Coptic bands in Aisling's book Tablet Woven Bands from Egypt (by Silvia "Aisling" Ungerechts).  It's in the 3/1 Twill section on p.100-101.  The book says that this was a small tablet-woven band on the wrist of a sleeve fragment.  The origin was described as "from the graveyard of Fajum".  She estimates it to be 5th to 7th century and typically Coptic.  The band is currently in the archives of the Skulpturensammlung und Museum fur Byzantinische Kunst, Berlin, Inv. no. 11429.


The band has only 8 tablets, 2 of which are edge tablets.  The design is white zigzags on a blue background with red edges.  Although that sounds simple, 3/1 broken twill and tie-downs (or whatever the opposite of a float is called) are used to create crisp lines.

I recharted the pattern to make sure I understood it.  Aisling warns that she's not always perfect at noting thread orientation vs tablet orientation for her charts, but since she likes to chart top-down and I like to chart bottom-up it ended up being kind of moot.  She does have a row 37 in the chart that seems to be unnecessary.  Also, as charted, there ends up being a white blip on rows 1 and 36 which doesn't seem to be in the woven band that's in the photograph on page 100.  For those two rows, I push down the white thread before passing the shuttle through the shed.  I could have turned back and forward instead but that would have left a float, I believe, and the photo doesn't seem to show a float.

As suggested, I'm using white and blue for the zigzags and red for the edge, and a similar shade of blue for the weft.  I'm using a darker red since the brighter one was not as colorfast as it should have been when I last used it, yikes!  I've only done a few pattern repeats but I like it a lot so far.  It weaves up pretty quickly and seems very rhythmic.  So far it's fun rather than frustrating.

The original is wool and linen, but as usual, I'm doing cotton.  The original is about 1cm wide.  Mine is likely to be a bit thinner than that.

This band is somewhat similar to a band in Tablet Woven Treasures by Maikki Karisto and Mervi Pasanen.  It too is a narrow band with zigzags of different widths.  In their book, it's number 36. Kaukola, Kekomaki (KM 2489:5 H1), p. 176-177.  The graveyard in which this particular fragment was found is thought to have been used during the Crusader Era, 1100-1300.  So that's interesting.

Onward!


Monday, September 30, 2024

A band with a spiral motif (kivrim)

I  haven't done a kivrim pattern in a long time.  I wanted something quick and cheerful and noticed this very typical spiral style pattern motif on an internet photo.  I charted it up (just to understand the pattern since there are plenty of existing charts out there) and then got started.

It went quickly and was fun.  I've come a long way since my first running-dog/rams-horn band...


I think I did about 108 pattern repeats, for a band that is about 1/2" wide and 63" long.  The warp is the usual Aunt Lydia's #10 crochet cotton and the weft is some leftover black doily-knitting thread.

I think I'll keep this one in my repertoire.

I'm not sure what I'll do next.  I want to finish a spinning project and maybe knit a quick doily.  Any number of tablet-weaving projects are whispering at me, and ditto for braiding.

This would have been finished sooner except that one of my cats likes to sit on the band (actually, the unwoven tensioned warp) not long after I start weaving.  At that point I switch to a different project until she's done with her nap.  I've learned from experience that getting a cat off the weaving is a dangerous thing to do since the cats think it's a fine game and bring out their claws to tangle the warp and potentially shred my fingers.

It's hard to find solid info about the history of the kivrim technique.  I know it's not really seen in old European and North African tablet weaving.  It's definitely known from 19th century to early 20th century Anatolia.  But when did it really appear and how widespread was it?  Did other tablet-weaving cultures do anything similar?

Kivrim still seems like a sub-category of diagonals-technique patterns to me.  The things that seem to be characteristic (at least what I see so far) are (a) the bands often have a unique threading on each tablet as opposed to a more generic threading sequence (such as ABAB or AABB); and (b) some of the tablets are balanced in their turning while others accumulate twist (though this is not completely diagnostic since other techniques may -- or may not -- do the same).


Tuesday, September 17, 2024

Monotonous Monochrome tablet weaving (the Thin Blue Band)


Well, it's done.  Yay!  By the end, I was very tired of it.  I started with roughly 3 yards of warp and ended up with about 83" of band.  I could have eked out another few inches, but Yet Another warp thread had frayed and broke, and I was tired of replacing them.


The band's width varies from about 7/8" to about 15/16", which is a bit more than I like to see.  Hopefully some of that will go away when I block it.  Ditto for the wavy lines which are a result of how I tensioned it and advanced the warp.

As I wrote in the previous post, this is the pattern seen in the Museum of London band 449 (according to Grace Crowfoot) and also in the pre-Roman El Cigarralejo pattern (according to Aisling).  It consists of 4-threaded tablets that alternate orientations -- 3Z and then 3S (or vice versa).  I used 30 tablets.  My aim was to get it to be >1" but obviously that didn't happen.  It's a nice looking band anyway.

I used my Robin & Russ Handweaver tablets since I didn't know how many tablets I'd thread up when I started.  The thread is the same teal thin cotton 2-ply I've been using, as gifts for a friend.  The combination of large tablets and thin loosely-plied yarn was not a great one.  It was hard to turn the tablets and clear the shed, and eventually the thread started to fray and pill.  My weaving area has a thin layer of blue lint and cotton-plus-cat-fur pills under where the band was being woven.

I think the R&R tablets are going to be retired unless I'm doing a project where I don't have enough tablets of a smaller size.  Some are getting worn out, but the real reason is that I do truly prefer the smaller tablets.  I probably have a few Linda Hendrickson tablets around that have extra holes for Andean pebble weave, but those are special purpose tablets that aren't going to be in general use.  Plus I bought them to support one of the wonderful people who publicize and teach the various techniques of tablet-weaving.

I'm not sure what I'll do next.  The Mammen 3/1 twill band is calling to me (Aisling's chart, probably).  Or maybe I need to do more cords or the double-face Durham seal tag patterns.  Or play with the little 3D-printed rigid heddle someone gave me.  Or do more inkle weaving or backstrap weaving.  Etc.  I'm also gonna be doing a bit more spinning and knitting as the weather cools.

I might try to make more stuff from the teal and gold my friend supplied.  We'll see.  Right now I'm irritated at it, so it's all gonna be in timeout for a while.

I taught another class recently.  I wasn't sure what to teach so I took my cue from the attendees.  It ended up being twisted cords and the 7-strand Fill the Gap braid.  They had fun and so did I.