Friday, February 28, 2025

This Year's Final February Fingerloop Braid Post

At least I think it's the final fingerloop braid post of February 2025.


Ingrid Crickmore says that this pattern looks very striking as a square braid.  She's correct!  Find it here: https://loopbraider.com/2015/10/18/flat-6/.  It's braid "6FL-5. Piole + W".

I used my usual Aunt Lydia's #10 crochet cotton on this one, to make a finer braid than the braid made from rug warp.  I followed Crickmore's colors and patterns.  La and Lb had dark red loops and Lc had a black loop.  Ra and Rb had white loops and Rc had a black loop.

I did this as a V-fell braid and started braiding with my right hand.  The braiding sequence is: little finger on the right hand goes through all the loops on the left hand and picks up the left index finger loop by hooking over the top (reversing it).  Walk the left hand loops.  Left ring finger goes through all the loops on the right hand and picks up the right index finger loop by hooking over the top (reversing it).  Walk the right hand loops.  And repeat.

It reminds me of a king snake, with the black between the red and the white.  The colors don't show up amazingly well in my photo.  It's really very nice and dramatic and colorful.

I made two braids with this pattern, to give as a gift.  I didn't measure the braids but they're the usual 14-20" long or so.  I tried to arrange the braids so that both sides can be seen in my pic.  That is one small critique of Crickmore's site -- she usually (but not always) only shows the top side of the braid, i.e., whichever side has the coolest looking color pattern.

The finer the thread, the longer it takes to make the braid.  Of course.  I only dropped one loop per braid, and each time it was very easy to pick up and continue braiding without an obvious blip in the braid.

I'm not sure which braids I'll do next.  I do like these cute color-patterned braids.  But it's also fun to learn new braiding structures and techniques, and to continue practicing the braids that I don't do that smoothly yet.

Tablet-Woven 3-Hole Sampler Band

It is finished.

I ended up doing all of the 12-tablet charts in the 3-hole chapter of Tablets at Work.  The photos show the entire length of the band, with a lot of overlap from photo to photo to make sure I didn't miss anything.  I'm not showing the backside because it's kind of irrelevant, even though parts of it actually look kind of cool.


As you can see, I used 2 strands of white and 1 strand of teal per tablet.  There are 12 pattern tablets (3-threaded) and 2 edge tablets (4-threaded) per side, for 16 tablets total.  All the pattern tablets had a / tablet orientation (S-threaded) except for the edge cards, which were / \.  The weft was the same color and thickness as the white background threads of the warp.

The chapter (and my band) started out with a bit of the basic background pattern, which is pretty similar to the Sulawesi background pattern (in its 3-hole variation).

Then there were a few diagonals-type patterns that showed the interest added by the line of missing holes.

Then Wollny goes into what she calls "waffling", which is when the hole orientation of the tablet is turned back and forth to keep the hole on top of the band (the reverse side shows a float).  It ends up looking like those parts of the band are woven cloth rather than tablet-woven.  She also goes through the floats that can be added by waffling the pattern color and then each of the background colors.

Then she shows a tacking stitch, which is when two adjacent tablets either turn slightly forward or slightly backwards to bring up the pattern color for just that one throw of the weft.  She shows this as turning the tablets 1/8 turn.  I found that awkward.  So, for one tacking stitch set, I can use my fingers to manipulate the threads on the two tablets, one up and one down or vice versa.  Or, because that becomes annoying with more than one of these, I can do an extra quarter-turn of each of the cards, through the weft, and then return the cards to their former orientation before the next pattern row.  This is pretty similar to the Finnish half-turns that are in some of the Finnish diagonals-type patterns.

The next two motifs have two more fill patterns -- one is the background pattern that we started with, and the other is also a double-face type pattern but with the pattern thread and one of the background threads showing instead of only the background threads.

And that finished the charts shown in the teaching/demonstration part of the chapter.  (Yes, I read the text, too.)  On to Wollny's pattern charts!

I didn't know how much room I'd have, but it turned out that I was able to do every single 12-tablet pattern in the chapter.  I used a few transitional rows between some of the charts, and I had room for one variation of my own devising (only a little bit different from one of Wollny's charts).

For charts that showed pattern repeat blocks, I tried to make sure that at least two pattern repeats were part of my sampler.  For one long chart, I divided it in half, doing the first part, then another pattern, then the second part.  I didn't do a second repeat of that chart, though.

My edition (the first) has an error in the chart on the upper right of p.508.  It looked really strange when I got to it, so I looked it up.  Yup, mistake.

In no particular order, I did charts from the following pages of the 3-hole chapter (which has a dark blue heading and is on p.476-523 of Tablets at Work by Claudia Wollny):

482 (all 3 charts), 485 (charts B and C; A is boring), 488 (all 3 charts), p.490 (A; the other two are not suitable for this band since I didn't want to add brocade), p.498 (the charts that are not repeats of other charts), 506 (tablet set-up and background repeat), 508 (upper and lower right; watch for the error in the upper chart rows 5-6), 509 (upper, middle, and lower left), 510 (upper and lower right), 511 (upper and lower left), 512 (right; I did the first part, did another motif, then the second part), 519 (upper left, upper middle, and upper right), 521 (upper left, upper middle, upper right).

And that's all of the 12-tablet charts I saw in the chapter.  There's one more at the beginning of the chapter but it's roughly the same as one of the other early ones I did.

It's not a particularly difficult technique, but as with anything else requiring a lot of individual tablet manipulation, can be a bit fiddly.  I did a certain amount of unweaving...

My conclusions and thoughts and what-not:

My favorite patterns and tablet manipulations are the very textural ones -- waffling holes plus or minus floats of the threads.  These are what I had thought of as the Icelandic Missed Hole technique.

The ones that are more like traditional diagonals patterns are nice enough, with the little line of holes adding some textural interest.

A lot of the patterns use ideas about modern diagonals -- tablets moving in sets of two, two tablets and two rows at a time.

Three hole feels very different from two hole, though some of that might be because I like weaving the Latvian two hole designs and these three hole designs feel like they are coming from a different designing/weaving tradition.

This technique has some similarities with Sulawesi as well as, of course, diagonals.  And float patterns.  And double-face.  Heck, the more tablet weaving I do, the more connected everything feels to everything else.  All of the techniques are variations of other techniques.  Or so it sometimes feels like.

Wollny gave a very simple/universal/general tablet setup, suitable for anything.  Depending on the design, it might make more sense to have the tablets in a long V formation (the tablets on the left half of the pattern set in one orientation, either / or \, and the other half set the other way) for symmetric designs.  Or set them Sulawesi style, with two tablets set / alternating with two tablets set \.  Or maybe this way ends up working best for bands that will have floats and hole waffling.

I'm glad I did the sampler.  I have some ideas for my own designs, for the next time I do this technique.

And at some point, I'll start adding brocade, since that seems to have been a fairly common element of these bands in the archaeological record.

All of the above are subject to change as I think about it more and gain more experience and knowledge.

What's next?  I'm not sure.


Tuesday, February 25, 2025

A quick little post

I may add more to this post later.


This is the same triangle braid I did a few days ago -- 5 loops, V-fell, unorthodox (ring finger on one hand goes through middle finger loop of other hand and picks up the index finger loop of the other hand, hooking over the top).  I used 3 loops of light purple and 2 loops of dark purple.  I made two braids, to be given as a gift.  The finished braids are each about 20" long (not including the knot and fringe, of course).  I'll tighten the knots and trim the fringe before they're given away.

The braiding seems a little loose, which is interesting.  Is it the cotton rug warp?  Is it how I'm tensioning the braid?  Is it always like this and I usually don't notice?

The pic shows both the top and bottom sides of the braids.

I'm probably going to do a few more braids for giving away, with a variety of braiding structures and color patterns.  If I get more done today I'll add them to this post.  Otherwise there will be a new post later this week.  Crickmore's website is full of great inspiration.

------------------

I did finally warp up and start an Icelandic missed hole tablet woven band, yay!!!  I started by doing all the early exercises that Wollny includes in the first part of the chapter.

Background pattern, yup.  This is basically the Sulawesi background done in 3-hole.

Then a few patterns that are simple diagonals-type patterns where the holes are there but don't form the tabby-ish pattern.

Then we start with waffling, first with the holes, then with the color thread (which means floats), and with each of the background threads (before and after the holes, and yes, also floats).  Motifs are filled with different textures in the center -- various floats and double-face and background pattern, etc.

There's also a little tacking stitch, to pop up a thread from a different hole to tack down some of the long floats, or just to do it because it's ornamental.

Wollny recommends doing it by turning two tablets one-eighth turn, to bring up a lower thread and drop the higher thread.  I found this kind of messy when looking for the shed.

If it's only one tack, it's relatively straightforward to lift the lower threads and drop the higher threads for that one row.  For several tacks, it gets annoying.

These actually are very similar to the Finnish half-turns, and in the end, that's what I found to be the easiest.  Do another turn on the two tablets involved in each tack (either up or down), throw the weft, then bring them back to their original orientation before going on to the next move.

So that was all fun -- seeing how Wollny approaches this technique and some of the variations and constraints she considers when designing her own.

Now that I've done the sampler patterns, I'll choose random stuff from Wollny's charts for a while, and quite probably for the rest of the band.  If I get bored or run out of patterns I like before I run out of warp, I'll switch to 3-thread Sulawesi motifs or play around with diagonals charts or twill charts or other techniques that look good with 3 threads.

I like how this technique looks, and I like how it's both related to float work and combined with float work.  And now I've done a bit of float work, too.  Well, floats that are deliberate.

The waffling technique is often used in conjunction with brocading, but I won't be doing that for this band.

It's interesting to me how this feels different from 2-thread, at least the way it's presented in this book and possibly in archaeological/historical examples.  They each have a characteristic texture, which is a lot of it, I think.  Also, the tablets are relatively stable without much effort, unlike 2-hole tablets.

I'm using 12 pattern tablets along with two 4-threaded edge tablets per side, for 16 tablets total.  As usual, the motifs are a bit elongated, though I'm trying not to tighten up too much on the weft when I throw it while still trying to keep it firmly packed down into the shed both before and after I turn the cards.


Sunday, February 23, 2025

Colorful Oseberg tablet woven band (and a little bit about the Sion 269 purse braids)


 Hmm, I guess my "next band" wasn't in the Icelandic Missed Hole technique.  I saw a Sally Pointer pic of a colorful Oseberg-pattern band and decided that I needed one, too.  Luckily Oseberg is easy to chart up, especially with the fairly clear photo that was posted.  This version is symmetric and has 11 tablets.

Hers is probably in wool.  Mine is the usual big-box store cotton.  She used black, light green, yellow, and a pinkish red.  I don't have enough black cotton left, so I changed it out for purple.  And the reds I have are a little too bright, or something.  I switched to orange.  What the heck, let's make sure we cover all the secondary colors, right?

The backside is not quite the same as the front side.  I have a small length of the reverse side along the bottom of the above pic, and you can see the blip of orange between the parallelograms, while of course the orange is in the middle of the parallelograms on the front side.

You may not be able to make out the colors in the above pic, so here's a close-up.  The colors are still a little washed out compared to the actual band.


The weaving went as quickly as one might imagine.  I like it a lot.  It's very cheerful and colorful!  It's destined for a gift.  It's the usual 66"-ish long and about 1/2" wide (12mm/167cm).

You can see how the twist of the thread ply interacts with the twist of the tablet-weaving.

Maybe I should make a few more of these in various bright colors, just for fun.  Or in between other, more complicated projects.

---------------

Yesterday I nerded out about the Sion 269 purse braids with a friend.  Now someone else knows how to make them!  The friend might be a little more concerned about the reversed vs unreversed version than is necessary, but it's still a cool little detail that not everyone would have noticed let alone cared about.  And it does say something about the group of purses -- even with apparently the same yarn, different knitters and different braiders were probably involved, given these small differences in braiding technique and also the differences in knitted gauge.  I'm not sure the yarn is the same -- it's hard to compare the exact color shades and thus the dyelots from one photo to the next.

My friend randomly arranged the loop colors in a pleasing order and instantly re-created one of the color sequences of the actual purse braid.  Boutrup/Speiser speculated that the braids were made by the same person or at the same time since a lot of these 6-loop unorthodox braids have the same or similar color sequences, and that seemed statistically unlikely if multiple people were making braids.  It might just be something about how the human mind works instead.

I've changed my mind a bit on how the appearance of the 6-loop A-fell unorthodox Sion 269 purse braid changes based on whether the loops are taken reversed or unreversed.  There really is little or no consistent difference, and my current theory says it's as much or more about how we do the moves and tighten the braid as it is about the exact path the loops take.  So, unless one is doing bi-color loops, the braids come out looking pretty much the same either way.  At least with the acrylic yarn I use for experiments.

I should do some Slentre style braiding experiments.  Those Skjoldehamn wide braids (and the Hedeby apron braid) -- how easy are they using the Slentre technique?  They're easy enough to do freehand, especially for long braids.  But I have a small speculation that might need a bit of experimental data; perhaps the Slentre fingerloop braiding method, first recorded in the Faroe Islands, is the last stronghold of a much wider braiding tradition?  Testing this idea with some of the archaeologic braids could be interesting.  Probably not, but you never know.  Many can probably be done with other fingerloop methods, with loops used to hold the tension even if loops are treated as single elements, as with the pigtail braids.


Tuesday, February 18, 2025

Fingerloop Braid of the Day (5-loop triangle fingerloop braid)

Today's quick braid.  The top photo is the front side and the bottom is the back side.  Or whatever they're called -- twill vs hopsack or whatever.


I'm thinking that V-fell finger dexterity is something I should work on, to be able to do those 9-loop braids more smoothly.  My thumbs seem to be working OK but my ring and pinky fingers are moving more awkwardly.  Dunno if it's the way I'm holding my hand when there are loops on the thumbs, or if it's my ring and pinky fingers in general.  So I looked at Ingrid Crickmore's site for inspiration.

This tutorial, and in particular, the little 5 loop braid in the first photo, grabbed my attention as something quick and easy to do.  Mostly, it was because I also want to play around more with color patterns and designs and stuff, and because I'm still thinking about unorthodox braids, reversed and unreversed loops, and the like.  The tutorial is here:  https://loopbraider.com/2017/08/07/uo-triangle-5-7-9tut/ and because I felt like it, I watched the video for it here: https://www.youtube.com/watch?v=3M8MrVx9rCA&ab_channel=IngridCrickmore

Crickmore calls this a Triangle Fingerloop Braid of 5 loops.  And so it is.

This is an unorthodox braid, done V-fell.  The ring finger on one hand skips the ring finger loop on the other hand, goes through the middle finger loop on the other hand, and picks up the index finger loop from over the top (reversing it).  Walk the loops, repeat on the other hand, etc.  With this braid, the loop nearest the traveling finger is skipped over and the loop closest to the about-to-be-picked-up loop is gone through.

Let's see if I can write it out...

Loops on left hand, on a, b, and c fingers.  Loops on right hand, on a and b fingers.

Rc skips over Lc, goes through Lb, and takes La reversed (hook over the top of the loop).  Walk the loops on the left hand.  Lc skips over Rc, goes through Rb and takes Ra reversed (hook over the top of the loop).  Walk the loops on the right hand.  Repeat.  Tighten the braid as necessary.

The yellow doesn't have enough contrast with the white, but that's OK.  The braid was indeed quick and easy to do, of course.  It helped that I was careful to have all the loops the same length.  My fingers seem to be reasonably dexterous.

I showed both sides of the braid since Crickmore often only shows the top side and I wanted to see what the other side looked like.

There's another page on the site that diagrams out the color patterns for the braids in the triangle fingerloop braid tutorial page, and it's here: https://loopbraider.com/2017/08/30/uo5-11-triangle-patt/.  The braid I did is the top one, which she calls Bicolor Chevrons.  I might have done this exact braid before, or if not, something similar from her diagrammed-out choices.  But I wanted something nice and easy, so I could go back to basics and work on my fundamentals, and this was a fine choice.

I know that if I take the loops unreversed, the colors on the V will be mirror images...  I might do that at some point just to see if/how it changes the braid's shape.  I can also take an occasional loop or two unreversed semi-randomly (or deliberately) to change around the pattern every now and then.

Dunno if I'll crank out a few more 5-loop triangle unorthodox braids, or if I'll move on to 7-loop braids next, and whether they'll be triangle braids or what Crickmore calls D-shaped or some other unorthodox or even orthodox braid(s).


Monday, February 17, 2025

Today's fingerloop braid twiddles


Neither is from Sion purse 269.  Whew!

The top braid is a 6-loop pigtail-style braid.  It's the fingerlooped version of the Skjoldehamn 6-element braid.  Fingerlooping is fast and efficient, but so is freehand braiding.  I do notice that my braid has a bit of a spiral to it.  I wonder why?  I did this A-fell, on the theory that A-fell was the more common braiding style in Europe.  Maybe I should try it Slentre style.

The bottom braid is a 9-loop square braid.  I'm still pretty clumsy at it -- transferring loops from my pinky finger to my ring finger is not yet smooth, especially if I don't want to drop the loops on my other fingers or my thumb.  It didn't help that not all of the loops were exactly the same length.  But I'm slowly getting better.  I did this V-fell, of course.  On my left hand were 4 yellow loops and 1 pink loop.  On my right hand were 4 teal loops.  The pink yarn is slightly thinner than the others, apparently, since it's nearly invisible in the braid and the photo.

I want to improve at the 9-loop braid since there are lots of fun things to do with 9 loops.  Also, I should start doing fun braids again in addition to trying to figure out actual historic braids.  (Not that I figure out much, since I'm sure the braids are pretty obvious to most experts, which I assuredly am not.)


Saturday, February 15, 2025

Today's Sion purse 269 6-loop unorthodox fingerloop braid exploration (so far)


The above pics show the fronts and backs of the braids.

Both are unorthodox 6-loop fingerloop braids, A-fell technique, index finger goes through middle finger loop before grabbing the little-finger loop on the other hand.

Both are done with 6 different colors, using 2 strands for each color.  For each strand, I did one long loop, hooked it around my tie-off point, and put a finger into both loop ends.  If that makes sense.

The top one (both pics) was done with the loops reversed, hooked from the bottom of the loops.  The bottom one (both pics) was done with loops unreversed.

Conclusions:

The loops-reversed braid is a little wider and flatter than the loops-unreversed braid.  The loops-unreversed braid is narrower and more domed.

The loops-unreversed braid is less nicely interlaced on the flat side of the braid than the loops-reversed braid, but it's still possible that's something about how I braided and tensioned things.

In the loops-unreversed braid, I can see little peek-throughs of the previous-color strand.  That corresponds to what I see in the Sion purse photos I've been talking about, and is consistent with my initial conclusions about how the drawstring braids and purse strap braids were done.  I can see them in the loops-reversed braid but they're not as obvious.

Now that I've worked with these braids for a while and know what to look for, I can sort of see the flat/interlaced sides of the braids in the Kornbluth photos in addition to the sides with the Vs.

I think that I'm done with this braid for the moment, at least in the context of trying to understand the braids on Sion purse 269.  But I've said that before, so who knows?

---------------

I'm pretty sure my next tablet weaving project is going to be in the Icelandic missed-hole/3-hole technique.  I'm curious about what Wollny calls "waffling" -- areas where the tablets turn forwards and backwards to keep the missing-hole tablet position on the top (or bottom) of the band, so that there are floats on one side and a tabby-looking area on the other.  She has a fair number of charts in Tablets at Work, so I can do a sampler and check out some of the different characteristics of this technique.


Friday, February 14, 2025

Unorthodox braids with an even number of loops, part the next (4 loops!)

I'm gonna be doing more experiments with the Sion A-fell unorthodox 6-loop braid, but for grins I quickly tried the 4-loop version.

Ooh....  It's fun and educational!

I cut 2 loops and folded them in half, which is why this braid is 2 colors.  I started with one color on the middle finger and the other color on the ring finger.

The 4-loop A-fell unorthodox braid:  the index finger goes through the middle finger loop and picks up the ring finger loop on the other hand.  I started with my right hand, but it's probably very similar or the same if one starts with the left hand.


This makes a triangular braid which spirals slightly as it grows, though of course some of that could be me or the yarn I'm using.

First I took loops reversed, hooking from the bottom of the loop.  I really like this one!  It forms 3 Vs, one per side (the bottom is slightly looser but it's really not noticeable unless you look for it).  The colors are nested V V V V, alternating colors, rather than being a spiral.

Then I took the loops unreversed.  The braid is a little tighter.  The shape is a very high domed D with a shallow groove in the bottom.  The top looks like a round braid and the bottom looks like a square braid, and like above, there are three sides to the braid if you count the top D as two of the sides.  There is one V on each side of the D and the other two sides are lined up as / or \, so it looks like a V on one side of the braid is connected to an A on the other side, in a longish ellipse.  If that makes sense.  The top of the braid looks like A V, with the inner part of the A connecting to the inner part of the V of the next-down level of the braid. The bottom is a slanted line(s) that goes across the groove, which connects the outer edge of the V with the outer edge of the A on the previous-up level of the braid.  It too is a very nice braid.

Then I took the loops reversed, hooking from the top of the loop.  This is very similar to hooking from the bottom.  I think (but I'm not 100% sure) that hooking from the top is not quite as crisp, and my guess would be because hooking one way slightly twists the plies of the yarn, while hooking from the other direction slightly untwists them.

This is a pretty fabulous braid and I will keep it in my repertoire.  I will eventually see what happens with loops of different colors, bi-color loops, etc., and also compare it to a 4-loop orthodox braid (this is an orthodox braid on one side but not the other).  But wow, this is a very quick braid to make and gives a lot of bang for the buck.

If I get to 6-loop braids today, I might add on to this post rather than make a new post.  Or I might make a new post anyway.

Dunno if I want to draw out the Noemi Speiser style track diagrams for these braids.  Eh, probably not.  Or at least not yet.


Tuesday, February 11, 2025

Finished: Band 41 from Tablet Woven Treasures

It is done!


You can see the waviness in this pic (given the way the light was, it highlighted this particular aspect of the band) -- that's pretty typical for patterns made using the diagonals technique.  It'll block out, especially if I iron the band.  I kind of like the three-dimensionality, actually.  Most of the time it's not that noticeable unless the light hits it just right.

Here's another view:


The band turned out well.  Occasionally the edges do pull in more than I had planned.  It required a bit of care to keep the width consistent while doing the tubular edges.  I eventually started using a chip clip just below the weaving zone to keep the band flat, and that helped keep it from curling inward.

I had thought I'd run out of weft partway through and need to switch, but I finished with about 6-8" to spare.  OK, maybe I could have eked out one last pattern repeat, but even the final one I did was kind of awkward.

The finished band is about 5/8" wide, give or take a bit (15mm) and about 65" long (164cm). I like the motif.  Even with a lot of individual tablet manipulation, it was fairly quick and straightforward to weave.

There are 52 pattern repeats of 16 rows each, 11 tablets (7 pattern tablets and 2 edge tablets per side), diagonals technique with tubular edges (both sides) and half turns, and including a few areas where 3/1 twill and double-face techniques are used to maintain the background colors.

Dunno what band will be next.  So many wonderful possibilities....  Plus there's the fingerlooping and other things on my want-to-do list.

Monday, February 10, 2025

STILL nattering on about the 6-loop fingerloop braids of Sion Purse 269

In my last post on this subject, I added the following a little while later:

------------------

Edited to add (because it's not worth another post)...

I think the circled area is one strand in this photo of the drawstring.  There's that one light-colored ply in the yellow strand which makes it distinctive. (Yeah, I know it's two strands of yarn.  But I'm using "strand" in the sense of "one side of the fingerloop".)  Maybe, because I can't 100% conclude that the other strand of the braid is different -- maybe the entire loop has that lighter ply.  Or maybe it's just this one short stretch.


But, if this is the same strand of yarn, and if it is different from the other strand, then the two Vs are symmetric, and thus the loops were taken unreversed.

--------------------

The above photo is of the purse drawstring.  Now let's do the purse strap!


It took me a few minutes of looking, but I'm pretty sure I've circled the same strand.  It's blue, and one of the plies in one of the braiding elements is significantly thinner than the other, while the other blue strand has both plies pretty similar in both of the braiding elements.  And given the same caveats above, this braid took the loops reversed.

------------------------

So......

Did the braiders not care if the loops were reversed or unreversed?  The reversed seems slightly flatter to me, but I'd need to do more careful experiments, removing or duplicating other potential variables, to be sure.

If the braiders didn't care, then this may be evidence of two different braiders.  Although it's possible that a braider would switch back and forth, it is also possible that different braiders had their favorite or customary way to make this braid.

If the braiders cared, then they were interested in something about the difference between the two methods.

Maybe I'll make a few more braids and see if there are consistent differences between taking the loops reversed vs unreversed (and maybe also with reversing the loop in the other direction, i.e., hooking it from the top instead of the bottom).  Also, I should start working with doubled strands at some point, maybe in a finer yarn or thread.  If I'm feeling terribly ambitious, I can try some other unorthodox braid structures, too, such as going through two loops instead of one.  Though given how easy it is to do the unorthodox braid going through the middle-finger loop, I'm pretty sure that's what the braiders would have done if they were cranking this braid out in industrial-ish quantities.

------------------------

My current tablet-woven project is almost finished, yay!  I'm still having fun with it.  I'll throw in pics and ramble about it in another post when it's finished.  I'm already thinking about what I might want to do next.


Friday, February 7, 2025

Yet More about the Braid on the Knitted Sion Bag 269


I did a few more unorthodox A-fell 6-loop fingerloop braids where only the loop next to the traveling finger is gone through on the way to pick up the loop on the other hand, trying to understand the difference between loops taken reversed vs unreversed.  First I did 1 bicolor loop (yellow and blue) with the other 5 loops blue, to see the path that each half of the loop takes.  Then I did 2 bicolor loops (all with different colors) and 4 blue loops to double-check.  Each braid started with reversed loops and then went to unreversed.  For the first, I went back and forth, but I think I just did half and half for the second.  I also dropped loops at random intervals and sometimes moved them around, so don't pay too much attention to the exact order in which the loops occur.

Conclusions:

The general appearance of each is pretty similar.  They both have a D-shaped upper part with two Vs and an interlaced lower part.  I can't tell if one is flatter than the other.  Maybe?  But it also might be how I tightened the braid.  There were easy but slightly different ways to tighten the braid depending on how I picked the loop.  If that makes sense.  This is something I should maybe investigate with different yarn/thread, trying to stay consistent, to see if I can come to a more confident conclusion, and also to experiment with how the braid tensioning seems to affect it.

They are both quick and rhythmic to make.

There is a slight difference in the path of the strands which can be seen in the Vs.  The V is on one side of the braid and then the other (as it slowly travels around the hand).  If the left leg is Color A and the right is Color B, then it will still have the left leg as Color A and the right as Color B on the other side of the braid if the loops are taken reversed.  If the loops are taken unreversed, then one side will have the left leg as Color A and the right leg as Color B, and the other side will be symmetric, with the left leg as Color B and the right leg as Color A.


The above pic is a section where the loops were taken reversed -- you can see the yellow is on the same side of the V as the strand travels from one side of the braid to the other.


For this second pic, the loops were taken unreversed -- you can see that the yellow is symmetric (i.e. opposite) on the other side of the braid.

So....  if one can pick out an individual strand of yarn on the original Sion braid and follow its path, one can determine which method was used.  The spinning is irregular enough that it might be possible.  I'm a dimwit, though, and am easily confused when I try to follow individual strands.

Obviously the above info is useful when creating interesting color patterns in unorthodox braids using the same general pattern.  One can pick loops reversed or not in order to change things up.

Also, for the person who asked me about them, I think it will be sufficient to do the braid using either reversed or unreversed loops, at least until we can decipher the path of the braiding elements in the original.

I'll check again with the photos a few times to see if enlightenment will occur at some point.

The general braiding method for an A-fell 6-loop unorthodox fingerlooped braid in the manner of the 14th century Sion Purse 269:

Put loops on the middle, ring, and pinky fingers of each hand.

Hand 1  (I started with my right hand, but it probably doesn't matter if you start with your left):  Put your index finger through the middle finger loop and pick up the pinky finger loop on the other hand.  It's your call whether to take it unreversed or reversed.

Hand 2 (the left hand assuming you started with the right):  Do the same moves with the other hand.

Transfer the loops down (i.e. pinky picks up the ring finger loop, ring finger picks up the middle finger loop, and the middle finger picks up the index finger loops.  On both hands, of course.) to the initial set up and repeat.

-----------------------

So, much ado about nothing, and probably taking the slow-boat route to understanding compared to more experienced braiders.  It keeps me off the streets, I guess.  Dunno how many more experiments and posts there will be before I get distracted by the next shiny object.

-----------------------

My tablet weaving is still going well.  It's reasonably fun to weave and I like the motif.  I like how the band looks in the colors I'm using, even if it's not quite as contrast-y and striking as the colors in the book.  I'll probably choose different colors next time I make it, just for funsies.

I've consciously tried to loosen up my tension to keep the band flat and the edges roughly symmetric.  I'm also also use a chip clip across the pattern repeat below where I'm weaving to help keep it flat.  I do think that the interaction of tablet orientation and thread plying direction (and direction in which the weft goes) is mostly responsible for what I'm experiencing with the one edge rolling in a way that is different from what the other edge is doing.  I might only do one tubular edge next time.  Having only one tubular edge seems to be relatively common, and for this band, only one of the edges was preserved and no one knows if the other edge was tubular as well.

Also, as is common with bands made using the diagonals technique, it's gonna need some blocking and ironing if I want it to lie flat.  I kind of like the three-dimensionality of it.

---------------------

I'm having fun with the braiding, too.  Relic purses, the Skjoldehamn braids, Ingrid Crickmore's fun explorations, L-M BRIC, paracord stuff,....  So much fun.

-----------------------

Edited to add (because it's not worth another post)...

I think the circled area is one strand in this photo of the drawstring.  There's that one light-colored ply in the yellow strand which makes it distinctive. (Yeah, I know it's two strands of yarn.  But I'm using "strand" in the sense of "one side of the fingerloop".)  Maybe, because I can't 100% conclude that the other strand of the braid is different -- maybe the entire loop has that lighter ply.  Or maybe it's just this one short stretch.


But, if this is the same strand of yarn, and if it is different from the other strand, then the two Vs are symmetric, and thus the loops were taken unreversed.

Thursday, February 6, 2025

Band 41 from Tablet Woven Treasures (from Kaukola, Kekomäki (KM 2489: parts 67-68, 107 (H1))

It's been a while since I've done a Karisto/Pasanen band.  I was flipping through Tablet Woven Treasures for inspiration and decided to do Band 41, which was the top edge of a skirt from Kaukola, Kekomäki (p.190-191).  This is a cute little 4-threaded band that uses the diagonals technique with half-turns (along with a little bit of 3/1 twill and double-face sensibilities) and has tubular edges.  I like the motif.

The book shows the band in blue, yellow, and red.  My cheap cotton stash is starting to get low, so I ended up choosing different colors that I had a bigger supply of.  Mine is aqua/teal, sage green, and burgundy red.  It's pretty reasonable, I think.  (The pic's colors are not quite right, but close enough.)  The weft is random leftovers, as usual.  Since this isn't necessarily going to be a gift, and since both sides have tubular edges, I'm not going to worry about possibly needing to change my weft thread partway through the band.

There are 11 tablets, 7 for the pattern and 2 on each side for the tubular edges.  One thing I'm noticing is that one side curls under a lot more than the other.  Hmmm.  Dunno if it's my technique and tension, or if it's something about how the tablet orientation interacts with the yarn twist and the path of the weft.  I'll try to loosen up a bit to see if it helps.  If it is tension, I'm not sure which direction is tighter than it should be.

It's going pretty quickly.  There's nothing very difficult about it, but I do have to pay attention.  I like it so far.

Mostly unrelated:  There's a book that's been around for a while on Anatolian tablet weaving  (Tablet Weaving from Anatolia and the Ottoman Court).  Sarah Goslee's review (https://www.archaeologicaltextiles.net/pages/anatoliaTW.html) mentions kivrim aka ram's horn style motifs on some of the bands, and that these motifs weren't found on bands (in the book's photo section) that were pre-17th century.  So there's an approximate date for when kivrim patterns were known to exist.  They go back to at least the 17th century in that part of the world.  So there.


Tuesday, February 4, 2025

Continued Exploration of the Braid on the Knitted Sion Bag 269

I tracked down more of the old online information about the cords on this bag.  There was something in L-MBRIC 7 from Joy Boutrup about them, though only through a link.  I was too real-life busy to download all of the L-MBRIC newsletters back when they were posted, so I have been using the pdf scans that have graciously been shared.  It's not always clear what is a link vs just random text so I probably missed out on some of the info in the newsletters.  However, the link is still alive in archive.org, yay, so I was finally able to read it.

Here are the archive links:  https://web.archive.org/web/20190914150706/http://lmbric.net/ is, I believe, one of the last complete (as much as possible) web-crawls of the website.

Here is the article as linked through L-MBRIC No. 7: http://lmbric.net/n7/sion/LM_NEWS2.HTM

Note to myself: I should go through all of the archive.org links and re-save them, checking out anything that is linked.  Some of them are in color, which the pdfs don't always preserve.  Plus, I want to make sure I have copies of things that were non-obvious links in the newsletters.  Sure, even these aren't 100% complete, but they will be good to use in conjunction with the scanned pdfs.   Oh, and it's cool that there are several articles about Sulawesi braids in the newsletters, along with a quote along the lines of all the old/traditional tablet weavers knowing all the local fingerloop braids, too.

Back to the article on Braids on Relic Purses in Sion, Switzerland, by Joy Boutrup.  Boutrup worked in conjunction with Noemi Speiser to examine these purses.  In person. Which means that I trust their expertise, and they had access to evidence which is not easy to determine from the insufficiently-detailed photos online (https://www.kornbluthphoto.com/SionPurse269.html, as is in a previous post).

They say that the main fat purse braid on bag 269 is an unorthodox braid.  Six strand, yep, that's what I could tell.  But unorthodox rather than orthodox.

Interesting....

That means that I'm not interpreting the photo correctly that supposedly shows the joining of strap and body on purse.  Unorthodox braids do not split into two separate braids when loops are taken unreversed rather than reversed.  So...  the drawstring braid (or braids) are probably separate from the purse strap.  And duh, the drawstring color order is different from the color order on the strap.  So, yup, different braids.

Also, I cannot see the backside of the purse or any of the straps.  I have to take it on faith that Boutrup and Speiser did, since unorthodox braids would be distinctive and they are both experts whose knowledge and experience I deeply respect.   I will say that the braid being unorthodox does explain the slight flattening of the strap braid in the photo, with the Vs of each color being a little too easily seen in the same photo instead of being on opposite sides of the braid.

(Hmm, the article doesn't say that Boutrup and Speiser were able to examine the backside of the purses or the cords.  But still, I trust their expertise to be able to distinguish between orthodox and unorthodox braids.)

Time for more playing around!  I cut 6 more loops, again paying no attention whatsoever to the order of the colors, and tried different things.

Doing a loop exchange (a loop on one finger exchanges with a loop on another) with 6 loops, without one braid going through another, is kind of annoying, so I gave up on that pretty quickly.  I had mentioned it in my last post, so wanted to try it this time.  It's easy enough with 4 loops, as demonstrated by the class I recently taught, but it would require more coordination of extra fingers than I wanted to deal with to set it up for 6 loops.  Someday I'll return to this idea.

I also did these experiments using A-fell (i.e. index finger as operator finger) since that's the more common technique in the European fingerloop braiding manuals.  Braids done as A-fell vs V-fell, especially unorthodox braids, seem to look different even for what seems to be the same structure.  So I wanted to remove that as a variable.


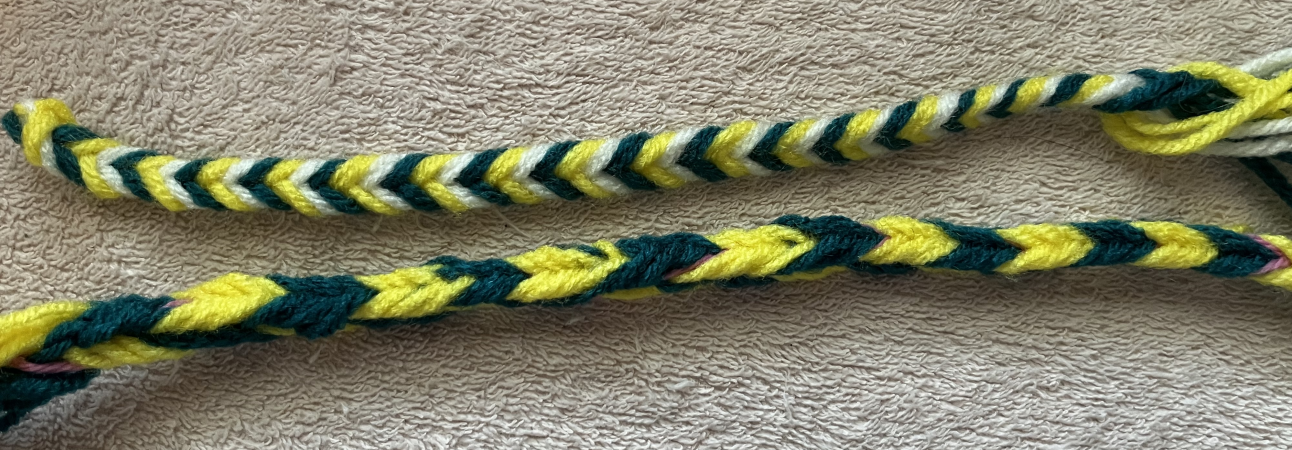
Hopefully the pics are clear enough.  It should be the front and back of the experimental braid.

I tried a few things.  I wasn't particularly careful about tension or anything like that and I tended to drop loops occasionally.

I went through only one loop on each hand.  (I could have done 2 loops on one hand and 1 on the other, of course).  I tried both going through the loop next to the operator finger, and going through the loop closest to the loop that was about to be taken.  I also tried reversed vs unreversed loops, though I didn't try reversing from above the loop, since below the loop was easier to grab.

Going through the loop closest to the loop about to be picked up is interesting but looks rather different from either a square braid or an unorthodox braid going through the loop next to the traveling finger.


You can see how the colors spiral up, with a short bit going in the other direction.  It looks that way on both sides.  So this is kind of a cool braid on its own even though it is not the braid used on the actual purse.  To try to be more clear, finger A travels through the last loop on the same hand before picking up the loop on finger C or D of the other hand.

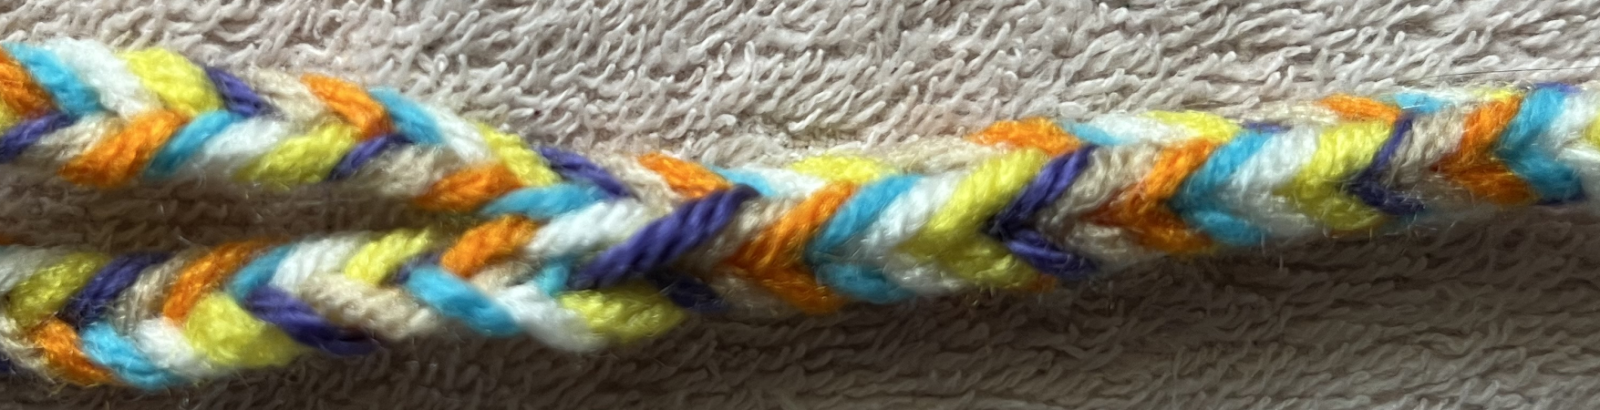
Going through the loop closest to the traveling finger gives the traditional look of an unorthodox braid, and the braiding itself is very smooth and quick, very little need to count or pay attention. It has the characteristic flat/rounded top with two Vs and a flat interwoven backside.  It looks pretty similar whether I take the loops reversed or unreversed, maybe a bit looser/flatter with unreversed loops but that could just be my technique at that point in the braid.

The simple unorthodox braid looks pretty similar to the square braid along the top, except that it is a bit wider and more domed than the square.  I did a bit of the orthodox braid in the middle of my sampler, for purposes of comparison with the other things I tried.

So, what was the braid used for the drawstring?  The same?  Something different?  It looks like the same braid but it appears to be a bit skinnier than the strap.  But who knows?  And some of that could be done by adjusting the braiding tension.  All the braids have 6 braiding elements, each of which consists of 2 strands, and the dyelot of the colors matches across the braids and also the purse.

I can't make enough sense from the online pics to understand what I'm seeing about how the purse strap was attached, how the draw strings were connected, etc.  I believe there are two drawstrings (since the Vs go in the same direction for both when they can be seen), one for each side of the purse, and that they are tied together at each end.  I believe that the strap is separate and it must somehow be sewn onto each end rather than going through the drawstring holes.  Also, where are the starting and ending parts of the strap braid?  One end is shown in a photo but I honestly have no idea what's going on there.

It is entirely reasonable for the braiders to have done an unorthodox 6-loop fingerloop braid with the braiders only going through the loop next to the traveling finger on the way to the loop that is about to be picked up.  That is fast and smooth and sufficiently symmetric for each hand.  So, given that Boutrup and Speiser say that this 6-loop braid is unorthodox, that is what I would currently go with.

I should try this style of unorthodox braiding with other even-number braids.  (I've mostly done it with odd-number braids, which is more traditional.)  And I should also do more fingerloop braiding in general since I do enjoy it and want to keep increasing my skills and my knowledge.  Though maybe I wanna warp up another tablet weaving project.  Or knit myself a Monmouth cap.  Or drag out a spinning wheel and some roving.  Or see what length heddles I prefer for my inkle loom and warp up a quickie band.  Etc.

Is this the end of my exploration of this braid on this purse?  Probably not...


Monday, February 3, 2025

Initial exploration of the braid on the knitted Sion bag 269


Two posts in one day!  I didn't want to combine this topic too much with the last post, and there's no reason to wait until tomorrow to post again.  If I make more of these braids or have more things about it I want to write down, I'll probably add it to this post and/or wait until tomorrow.

The above photo is a first try at the Sion braid.  The braiding starts at the right and goes to the left.  I used six different colors though I made no attempt to line them up in the right order.

First is a loop exchange braid.  Rb and Ld swap strands (with the left hand loop going inside the right hand loop), then Rc and Lc, then Rd and La.  Repeat.  And nope, this is not the braid used for the strap of the Sion purse.

I didn't do a version where the elements were kept separate, though.  Hmmm, I wonder if that could be a kongo gumi equivalent?  Anyway, I don't think the structure will look too different from the one where loops travel through each other, and it's not gonna be the right structure anyway.  I'll try to remember to test it next time.

Second is a pigtail braid, where the outside element goes into the middle, first the right hand and then the left hand.  No loops go through each other.

Nope, that's not it, either.  It's too flat and the colors don't repeat quite the same way.

Third is my initial hypothesis for how the braid was created -- as a square/orthodox 6 strand fingerlooped braid.  I did V-fell, using my little finger as the operator finger.  The finger went through the strands on the other hand and picked up the other-hand index-finger loop, taking it reversed, then I walked the loops as necessary.  On one hand there will be two loops to go through while the other hand will have three loops to go through.

Yup, I still think that's it.  I also did it for a while with unreversed loops, to make sure it made the proper split braids that looked about right for the actual purse loops.  As far as I can tell, it matches the photos of the original.

I did another stretch of pigtail braiding to make sure I understood what I was doing, since the 6-strand pigtail braid is used for the Skojdehamn outfit as a decorative edge for the clothing.  It can be done freehand, but also with fingerloop methods.  I also wanted to be very sure it was different from the square orthodox braid, which it is.

And I finished up with a little bit more of the orthodox braid as a square and as a split braid.

Yay.

Here is a photo of the original braid:


And where it splits:


Here is mine again (just the area of the square braid and where it splits in two):


And a side view of the braid so you can see that it really is little Vs like the original is.


One more thing -- the original braid uses double strands.


An Akhmim tablet-woven band (and some ignorant braid ruminations)


This is a dead simple tablet-woven band.  It has 15 tablets, 4-threaded, alternating \ and / orientation.  All turns are forward, though one can turn backwards when the twist builds up if desired.  (I kept it all forwards.)  It's a simple pattern of stripes and Vs and it looks the same on both sides.  (The photo above shows both sides.)

It's meant for a gift/donation, where I like to do things that aren't too fiddly but still look nice.

The pattern is from Tablet Woven Bands from Egypt by Silvia "Aisling" Ungerrechts, p.20-21.  It's one of two Akhmim bands in this section of her book.  She says that the two bands from Akhmim are from hand-drawn images in the book Ueber Brettchenweberei by Margaret Lehmann-Filhes in 1901, with this one being in Figure 29 on p.20.  (The drawing is included in Aisling's book with the original caption of "Schnurband  aus Grabfunden in Akhmim".)

The original does not list the colors nor the width of the band nor the content of the yarns.  I have no idea if the band is in a museum somewhere or even if it still exists.  I don't see any information about how old it is, either, though I guess I could figure out some of these things if I went internet-searching or looked at Aisling's book more closely.  I'm glad that it was documented and that Aisling has shared it with everyone.

Aisling chose wool in red, white, and blue.  (A lot of these bands seem to use linen for the white/natural, but whatever.)  I am weaving with cotton, as usual.  It's better for gifts anyway since it's easier for people to care for than something which might shrink/felt unexpectedly.

I'm starting to get a bit low on colors in the Aunt Lydia's cotton stash (yay!), so I used my small, old stash of cotton rug warp, in dark purple, light purple, and olive green.  I'm getting low on this batch of cotton rug warp, too, which is fine by me.  I'm not crazy about its matte texture or how well it wears.

It turned out well.  I'm very pleased with it and am happy to pass it along.  It's a pattern I should keep in my general rotation for when I need to crank out something quick to use as a gift.

The band is around 15/16" wide (24mm) and around 65.6" long (169cm) before blocking.  It should work well as a belt, a strap, trim, etc.

-----------------

A friend has been chatting me with about the Sion knitted purse 269, which I think I mentioned before.  Photos can be found here: https://www.kornbluthphoto.com/SionPurse269.html with more of the Sion knitted purses (and other purses) here: https://www.kornbluthphoto.com/Purses.html

We had fun talking about knitting, dyeing, and spinning techniques.  Next up is the braid!  It's not completely shown in the photos.  In particular, I would love to see all the ends to see if there are any loops.  I'd also like a better look at the split braids compared to the main strap braid.  And the knots, of course.

So...  The purse is knitted in silk and it's pretty clear that the braid is made from the same yarn, in the same colors.  It's a six strand braid, with each braiding element looking like it consists of 2 strands of yarn.  For those who care, the yarn is Z spun and S plied, and dyed in blue, purple, yellow-green, orange-red, buff/tan (though this might have been darker or more distinct in the past), and natural/undyed.

It sure looks like fingerlooping at first glance, and indeed, I can easily crank out a 6-loop fingerlooped braid that looks right to the casual eye.  I need to do a 6-strand pigtail braid to see if I can get it to look right, and also do a 6-strand loop-exchange braid, though I'm not quite sure the way the loops cross matches, and also whether the color progression would match without a lot of careful set-up.  Oh, and a loop-exchange braid would have to be a 2-person braid, I believe, something I don't know much about yet.  Or maybe it could be done with bicolor loops.  Hmm.

Would the people making these purses known about 6-strand square fingerloop braids?  As far as I can tell, the simple square/round fingerloop braids that show up in the braiding manuals tend to call for an odd number of loops.  (Loop exchange braids tend to have an even number of loops.)  But it's not too hard to independently re-invent an even-number square/round fingerloop braid.  Another possibility is a fat fingerlooped braid that then separates the loops into two thinner pigtail braids (and/or is done with loops unreversed to split the fat braid into two thinner braids) as part of the pull-through closing strap.   The photos aren't quite clear enough, and I'm too much of a braiding noob, to quite understand what I'm seeing.  So I guess I'll get some yarn out and start to play.  I should also see if I can find the article I've seen reference to, probably by Joy Boutrup, on the braids of these purses.  If indeed it was these purses and not some other medieval-ish purses with fingerloop braids.

The fat knots and tassels on this and other Sion purses are entirely adorable, too.