Friday, January 31, 2025

The Seyðisfjörður band, in green


It's finished.  I like it, of course.  It's only 12mm wide (the original was 1.5cm), but that's OK.  It's about 166cm long.  I think it looks nice in the green and yellow.  The blue stripe in the edges is subtle but also nice.

I ended up doing two repeats of the flower/bud motif that matched the direction in the actual artifact, followed by two that faced the other direction.  Each flower/bud motif is separated by 3 X and 2 O motifs.  I did 13 full 64-stitch motifs and about 30 more of the 14th motif.  I could have eked out a few more rows, but decided it wasn't worth the hassle and it was at a reasonable stopping point.

Hopefully the recipient will like it.

This went pretty quickly and wasn't too fiddly, so it would be good to keep it in the repertoire.  This will be fun to try out in a thicker wool yarn someday.

What shall I do next?  Hmm, I'm not sure.


Tuesday, January 28, 2025

It's time for Seyðisfjörður!

The tablet-woven band found in Seyðisfjörður, that is.  It's interpreted to be the trim on a 9th-10th century smokkr.  It was found in a recent-ish Icelandic archaeological dig.  Everyone was making it back in late 2023.  Well, I guess now it's my turn.  It's intended as a gift for a friend.


Here's the link to a description of the find along with a pretty decent photo of the original band: https://fornleifur.blog.is/blog/fornleifur/entry/2284555/ 

Here's a description (and a reconstruction plus chart) from Aisling's website: https://aisling.biz/index.php/galerie/historisch/fruehmittelalter/333-die-borte-von-seydhisfjoerdhur.  She links to her Twisted Threads pattern page, too.

Elewys made this as well.  Her description and chart is here: http://ladyelewys.carpevinumpdx.com/2023/03/13/weave-along-with-elewys-ep-33-seydisfjordur-smokkr-weave/.   She credits at least part of the chart to Marcelo Oliveira.  I found a chart (maybe even the same chart) credited to Marcelo Oliveira on pinterest: https://i.pinimg.com/originals/e8/87/bc/e887bc81473afb72031649725648288d.jpg

There are a few other versions floating around, too, along with minor variations on the little leaf and flower motifs.

I'm mostly using the Oliveira pinterest chart.  Aisling's Twisted Threads chart doesn't quite match the band in her photograph, and I'm not in the mood to rechart it myself.

The "Chart B" on Elewys's blog seems to match the flower/leaf orientation in the original photo, so I started with that.  I don't give a flying flip about pattern neutrality since I use a warp-weighted loom, but I'll probably do some of the flower/leaf motifs from Chart A, and might well chart up the inverse of both of them (i.e. stems going down instead of up).

My friend requested green and blue, so I changed the red of the original to green.  I added an extra edge tablet on each side (in green) to make the band a little wider.  Even so, I'm not gonna match the 1.5cm width of the original, not with Aunt Lydia's 10 crochet cotton.

So...  14 tablets -- 8 for the pattern, 3 on each side for the edges.  Each pattern repeat is 64 turns, though a lot of it is Xs and Os.

Oh, it's a two-hole pattern, too.  That's always fun!  The original, of course, was wool, and I'm still working through my cotton stash.

It's going well so far.  I like how it looks and it's relatively quick and straightforward to weave.  Hopefully my friend likes it.

------------

I taught the 4-loop Makusua/Maize Blossoms fingerloop braid over the weekend.  That too went well.


Friday, January 24, 2025

Sulawesi sampler tablet woven band (done!)


It's done!  You can't see all the motifs in the pic, but the ones that aren't visible are very similar to the ones that are -- slight variations of patterns elsewhere in the band or mirrored motifs, that sort of thing.

It ended up being about 64" long and about 5/8" to 11/16" wide.  I haven't blocked it yet so it might end up more consistent after blocking.  I did use lots of small batches of thread as weft, so it's possible that different weft threads led to slightly different widths.  This band was not done specifically as a gift, so I didn't care if I used a mix of weft colors and thicknesses.  The warp is the usual Aunt Lydia's 10 Crochet cotton, in dark red, dark blue, and white, with purple and green for the edge cards.

I'm learning a lot from my experiments in design in addition to copying (or mirroring, or doing variations on) pattern charts from sagawoolcraft.com.

This was lots of fun, both the weaving and the designing.  My next Sulawesi band will almost certainly use more tablets so I can do wider designs.

I'm sort of surprised how easy and understandable this technique turned out to be.  It's very straightforward and relatively quick to weave.

What next?  Hmmm....


Saturday, January 18, 2025

Making Sulawesi progress


A few more motifs done (you can't see all of them in this pic, but they're there).  I'm really enjoying the Sulawesi tablet-weaving technique.  The motif on the right is one from Saga Wool Craft's website.  The one on the left is a slightly modified version of one of the Saga Wool Craft patterns.  Both motifs -- well, actually, all of the website's motif charts I'm using -- are from the 16-tablet gallery at https://sagawoolcraft.com/?page_id=2680.  I probably spend more time dithering and doodling than I do weaving.

It's very easy to modify or create patterns in this technique.  I have no idea if I'm following Sulawesi design sensibilities or not, but that's OK.  I'm getting the hang of doing this by only using line drawings of my motif and not needing to color in the boxes that are going forwards or backwards.  Since it's double-face, the rules are simple.

Sulawesi 3-color double-face (or whatever you want to call it) feels like a cross between double-face and the diagonals technique where pairs of cards turn together for two turns before potentially changing turn direction.

I'm gonna keep doing small motifs like this until the end of the warp.  Leaves, spirals, geometric patterns, animal-like patterns -- again, a mix of my own patterns, other people's patterns, and modified versions of other people's patterns.

I'm having a lot of fun.


Monday, January 13, 2025

Sulawesi adventures

I was in the mood for something new, and Sulawesi caught my interest.

What people refer to as Sulawesi tablet weaving is an interesting 3-color variant on double-face.  People in that part of the world also do double-face tablet weaving, though I don't know if the people who do this also do the more typical 2-color double-face.  Oh, probably, along with doing threaded-in plain weaving for borders and such.

With Sulawesi-style, tablets work in pairs.  Two tablets always have the same orientation and turn the same (2 tablets that have / or \ orientation turn forward or backwards together twice.  This means that one can chart it out using a single box to represent 2 tablets and 2 turns.  Or not -- one can also chart out every single tablet and turn.  Being able to use the box methods means that ideas can quickly be sketched out and charted out.  (The same sketches can often be used for other tablet-weaving techniques, too.)

Also with Sulawesi-style, the colors have a particular pattern.  There is a main motif color, a background color (or anti-motif), and an accompanying color.  The accompanying color has two threads, one on each side of the others.  (i.e.  MABA).  The tablets are oriented / / \ \ / / \ \ etc., i.e., alternating the orientation of each pair.  The colors go up and down in little zigzags -- for the motif color, for example, it goes in hole C D D C C D D C etc., all across the band, while the background color goes in hole A B B A A B B A all across.  Obviously this would easily lend itself to continuous warping techniques.

There's also some fun stuff the weavers there do with tubular edges and finishing the ends, but I'm mostly concerned with the basic tablet-weaving technique for now.

I have no idea how old this technique is.  There's not a lot of info on old artifacts and ethnography only goes so far back and is limited in what it covers.  I found a few 19th century artifacts online in the Yale University Art Gallery museum website but so far that's about it.  I'll keep looking.  The 19th century bands were often woven in cotton, by the way.  And in addition to Sulawesi, terms like "mamasa" and "toraja"  and "pallawa" turn up more links.

I also found a video, where the cards are flipped to change colors (rather than turning the other direction): https://www.youtube.com/watch?v=c4GSQu7dD0U.  It's not clear exactly what pattern the weaver is making in the video, but the band shown at the end is the same technique (though it looks like the background color is the same as the accompanying color and/or it's 3-threaded).

Sagawoolcraft.com is a blog and website with a lot of interesting Sulawesi-technique tablet weaving and charted motifs.  So that's where I started.  She charts slightly differently from how I do, but if I ignore her tablet labels and tablet set-up, it works out the same as with the Karisto/Pasanen charting conventions I prefer.  She likes having A at the top of the warping chart going down to D at the bottom, with D closest to the weaver and A towards the unwoven warp.  Karisto/Pasanen conventions have D at the top of the warping chart going down to A at the bottom, with A closest to the weaver and D closer to the unwoven warp.  Both start the pattern weaving chart from the bottom and both number the tablets from left to right across the band.

I recharted it (using one of the online charting websites) to be sure.  And then I made up some of my own motifs because it was fun and easy.  So...  I guess I'll be doing a mix of motifs from wherever I find them along with my own motifs.

There are examples online in other places on the Internet, of course.

Anyway...  I decided on a small band for my first effort.  It has 8 pairs of tablets (16 pattern tablets) with one extra tablet per edge (18 tablets total).  The edge tablets are threaded in colors A A B B, in colors different from the main band, to help me keep straight the direction the double-face turning needs to go in.  At this point, I prefer to turn cards forwards and backwards instead of flipping them, so of course that's what I did.


And.....  it's fun!  A little fiddly, but not horrible with so few pattern tablets, and it's pretty easy to see right away if you're doing it right.  My very first motif has been woven (and it's one of my own designs -- nothing fancy but I did it myself), and it's lovely!  I'm chuffed.  I'll probably do mix-and-match motifs rather than the same one(s) all the way down the band.  I do like a lot of the Saga Wool Craft motifs so why not add some of hers as well as my own designs?

These bands can be done with three or two threads per tablet, too.  If 3-threaded, then omit the background (anti-motif) color.  If 2-threaded, then omit the two accompanying threads.

I wasn't able to do any tablet-weaving for the last several weeks due to other obligations.  I'm glad I can resume tablet-weaving and other fun stuff again.

I'm probably going to be teaching people how to do 4-loop fingerloop braiding (for the near-universal square/round cord) in a few weeks.  I hope the class ends up being reasonably fun, easy, and useful.  I could do other 4-loop fingerloop braids as well, or other methods for making the same braid structure, but I probably will keep it simple and focused on only this one topic.  I'll probably show two ways to do it, though.  Or at least present two ways even if one of them is mostly left as an exercise for the braider to do some other time.  (I'll probably start with the Makusua maize blossom braid from L-MBRIC because it's easier for me to keep track of where I am in the braid.)

Now back to my band....  what motif shall I do next?  How many more shall I make up?  Do I care about pattern flow throughout the band or is this mostly a sampler of whatever I feel like doing next?


Wednesday, December 25, 2024

Yet more 4-element braid experiments


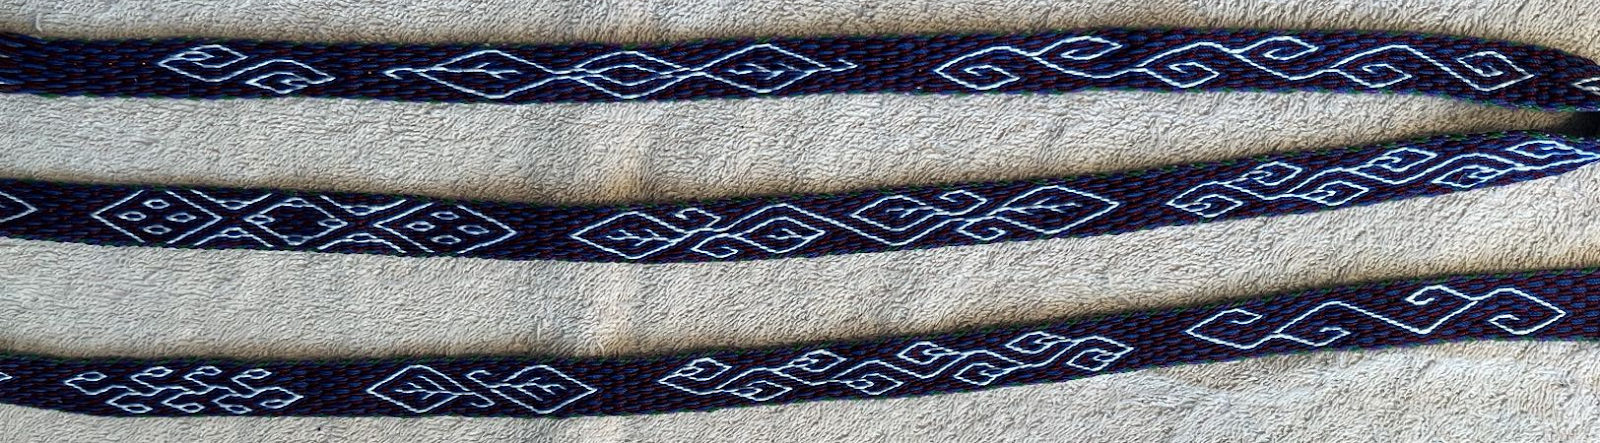
This might be my final post on this particular braid.  Or not -- you never know!

The above is a fingerlooped braid.  It spirals Z for part of the way, then S, then back to Z.

For the method where you shift the index finger to the middle finger, then pick up the other-hand ring finger and put the middle finger loop onto the other-hand ring finger...

If Color A starts out on the index fingers and Color B starts out on the ring fingers, it will spiral Z.  If Color A starts out on the left hand and Color B starts out on the right hand, it will spiral S.

You can shift from S to Z or vice versa by waiting until the colors are arranged the way you like, then repeating a move.   So...  you do the first exchange (either right or left hand), which brings the yarns into the other configuration.  Then repeat that first exchange instead of doing the second exchange.  Keep going from there, as before, until you want to shift the other way.

I haven't tried it yet, but my guess is that it's the opposite for the version of this braid where one moves the ring finger loop to the middle finger, then swaps the other-hand index finger loop onto the ring finger with the middle finger loop going to the other-hand index finger.  That's because with the first method, the index finger loop goes under the ring finger loop, while it goes over the ring finger loop in the second method.  With both (if I'm thinking about it correctly), the switch/twist between index and ring fingers goes clockwise when the right index finger swaps with the left ring finger, and counterclockwise when the left index finger swaps with the right ring finger.

I tried doing the loop exchange in one move but I wasn't dexterous enough to be able to switch loops without one going through the other and without dropping something.  So the two-step method works best for me so far.  (Transfer loop to middle finger, then swap the two loops pretty much at the same time.)

So.  How was the Skjodehamn hood braid done?

The argument for fingerlooping -- it's a short braid, made from two strands of yarn per braiding element, and fingerlooping is pretty fast.

The argument against fingerlooping -- it is not clear if any of the other braids are fingerlooped.  They might be, but they might not be.  In general (with a lot of exceptions), I'd expect to see some 5-loop fingerloop braids somewhere in this outfit, since in general (with a lot of exceptions), odd-number fingerloop braids and especially 5-loop braids, are so common in areas that do fingerlooping.  On the other hand, most of the braids are made from two strands per element, which is an argument for strong consideration of fingerlooping.  One more argument against fingerlooping -- this braid is not mentioned in any of the medieval braiding manuals, as far as I know.  Though I don't know if it would have been considered too simple to record.

Whipcording -- there is no evidence for the existence of this method at this time.  It's possible that long lengths were wound onto sticks rather than heavy bobbins, but that grades into the freehand braiding methods.  Whipcording (hanging the braid from a hook, then passing the bobbins back and forth, preferably with two people) is pretty fast, especially for making long lengths of cord.  The argument against this method being used, in whatever form, is that these are short ties, hardly worth the effort of setting up anything with bobbins.

Disk/stand -- again, no evidence for the existence of this method at this time, and the arguments are similar to the ones about whipcording.  It's definitely possible -- maybe a small table or tablet (for tablet weaving) with a hole in the middle could have been used, with a counterweight for the growing braid and sticks or small bobbins holding the cords.  But again, it would be better for longer cords.  It's an idea for portability, though.  I'll have to think about it.  A plain tablet (or square piece of something with a hole in the middle) would be easier than moving threads in and out of slots.  It could be pretty fast and would require only one person.

Freehand/in-the-hand -- This is a low-tech way to do this braid, pretty easy to rediscover anytime you need to do so.  There are several ways to think about how you do it.  It's a little slower than fingerlooping, but requires very little set-up or thinking about it.  It too is very good for shorter braids, and entirely possible for longer braids if one has a way of dealing with the long ends (such as wrapping them around a stick or small bobbin).

Other methods?  I don't know!  I'm still a wee small braider, with so much left to learn and understand.

Of the ones above, freehand and fingerloop are the most plausible.  In my opinion.  Given my current level of ignorance, which is pretty high.  My guess is that the person who sewed the hood (and/or the person who wanted the ties) might well have grabbed a bit of yarn and banged out the cord right then and there.  It is possible, of course, that there was already a much longer length of this cord hanging around (done on a disk or through whipcording or freehand) and they just whacked off a couple of short pieces of it to make the ties.

I don't have a good enough pic of the cords, nor do I have sufficient knowledge about braiding or about the culture that made these specific braids, to rule out the various possibilities.

---------------

I knew I had done a fingerlooping version of the 4-element braid before, and I tracked it down, yay!

It's the Makusua Maize Blossom braid of the Guajiro Indians (from northeast corner of Columbia, in South America), and it's in L-MBRIC 10, shown in the Illustrated Instruction Series (no. 10, of course, from 2007).  This one is similar to the Potosi method except that loops are swapped from hand to hand first, then shifted back to the original finger.

So, loops are on B and D fingers (calling them Lb, Ld, Rb, and Rd).  Ra takes ld.  Ld takes rb.  La takes rd.  Rd takes lb.  Shift loops a to b on both hands.  Tighten the structure every other step.  

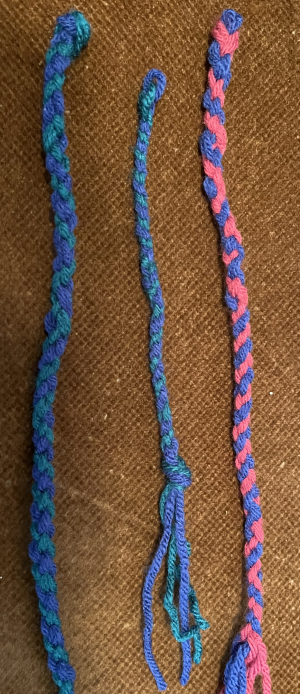
They give the three basic color patterns that can be done with two colors.  For Z spirals -- Color A on both b fingers, color B on both d fingers.  For S spirals -- Color A on one hand, color B on the other hand.  For vertical (as with the above) -- the diagonals are the same (i.e. the b finger of one hand and the d finger of the other).

So maybe I'm not quite done with this topic.  I might try both this method and the Potosi method to see which one flows more smoothly and easily.  I've done the Makusua braid before but don't remember much about it beyond the fact that I've done it.

I don't know why I get hung up on these picky little details.  They're probably very basic to most people.  But it helps me to do and explore things, thinking about why and what.  It does help my overall understanding of the underlying principles, I guess, even if I have to do it the slow and hands-on way.

Masako Kinoshita describes the Makusua braid as "new as an L-M recipe", interesting.

See my posts from February 28, 2024 and February 29, 2024 for my first exposure to the Makusua braid.

(edited later to add -- the Makusua and Potosi methods are both quick and efficient, as is my own variation.)

------------------------


Maybe I'll move on to the six-strand Skjoldehamn braids soon.  These too were done with two strands of yarn per element.  They can be done freehand or, I believe, through fingerlooping.  There's no point to doing them with whipcording, I don't think.

I think my class is likely to be this 4-element braid from the Skjoldehamn hood as done with fingerlooping.  I'll probably show or at least talk about other ways to make the braid (freehand, disk, maybe a description of whipcording), and also encourage people to experiment with using more colors, doing other color patterns and/or monochrome cords, etc.

Or I'll do the 6-element braid, and if so, probably freehand since that way is easy to demonstrate, and it generalizes to a lot of other braids in this style.

It's interesting that most or all the braids on the outfit use even numbers.  I wonder if that means something?  Ditto for the use of two strands per braiding element for most or all of the braids.


Monday, December 23, 2024

More 4-strand braiding silliness


The rightmost braid is the one mentioned in the previous post.  The leftmost braid is a repeat of the fingerlooping methods.  Again, I tried both methods -- move the index finger to the middle finger vs move the ring finger to the middle finger.

They're pretty much identical from a braid structure standpoint -- the index and ring finger on one hand switch clockwise, and the index and ring finger on the other hand switch counterclockwise.  With one, the index finger loop goes over the ring finger loop; with the other, the ring finger loop goes over the index finger loop.

Either one can spiral S or Z; it depends on the arrangement of the colors vs how the loops switch.  Do I remember which is which?  Umm, no.  But it was obvious when I'd mess up by switching the twist directions by accident, and then switching back.  I got both S and Z spirals with each of the methods.

Too bad the contrast on the left two braids is so low, because they were very informative.  Both are in green and blue, with the fatter braid being fingerlooped and the thinner one single-strand freehand braided.

The middle one happened after I poked around on the 'net and my own books and stuff.  It's a different method than the other freehand methods I wrote about earlier, though of course they're all kind of the same and it's mostly about the way my brain understands what is going on.

For the middle one -- think of these four elements being arranged in a circle instead of flat.  Instead of 1 2 3 4, we have NW SW SE NE.   As with fingerlooping and disk braiding, we're going to swap NW and SE in one direction, and then swap NE and SW in the other.

So... cross NW over SE, then cross NE over SW.  Twist your wrists and move your fingers (and strands) as appropriate to make sure that the pairs of elements crossing each other don't interfere with the currently-passive elements or vice versa.  As with the other braids, the spiral direction (and color pattern in general) depends on the arrangement of the colors vs the direction of the crossing twists.  One can, of course, cross under rather than over, but for me, the cross-over twist of my fingers felt more natural than the cross-under.

Here's a paracord video that shows it, though with the color arrangement that leads to vertical stripes rather than a spiral: https://www.youtube.com/watch?v=UtWWA6MQXGE and it can also be seen fairly well on Sally Pointer's video (the second braid, starting about halfway through the video): https://www.youtube.com/watch?v=TwVXwH_w2ng

Am I done?  Maybe.  I'm probably not going to explore disk/stand braiding or whipcording because the how-to for those is pretty straightforward.  I am going to try to pay attention to figure out which color arrangements lead to which spiral direction.  It should be pretty obvious pretty quickly.

Whipcording (aka Viking whipcord or interlocking or slinging) -- as far as I know, there's no unambiguous evidence of this method being used before the 17th century.  Honestly, though, whipcording just seems to be doing this braid with wooden bobbins to hold the excess length of unbraided yarn, plus hanging it from something high so it can be worked downwards vertically, plus adding a second person if so desired to make it a game (by tossing pairs of bobbins back and forth).  It would be useful if making long lengths of cord.  But for something that's roughly 8" long, like the Skjoldehamn hood ties?  I'm thinking freehand or fingerloop since either can be done pretty spontaneously.

Dunno if and when I'll explore more 4-strand braiding stuff, such as other braid structures.  I'm also not going to track the history of these braids, because they tend to be pretty universal over time and space, going way way back.  People are clever.

So one possibility for a class is this braid, period.  I could do the fingerloop method and only that.  Or I could do fingerloop and freehand.  Or even fingerloop, freehand, and disk.  It would be in the context of the Skjoldehamn hood ties, with a general discussion of this braid throughout history.

If I did a second class, it would be the 6 strand pigtail-type braid used decoratively on the cuffs, necklines, etc., in the Skjoldehamn outfit, both freehand and fingerlooped.

So ends today's ramblings on this particular 4-strand braid structure.  Maybe.  There might well be an upcoming post on the 6 strand braid and maybe an example of the 4-strand braid showing which color placements lead to which patterns, so my poor little goldfish brain has something to return to later.