Wednesday, January 18, 2023

Yet Another Brick-Patterned Band (2-hole tablet-weaving)

 The original was the starting band on the hem of an apron.  It was done in thin wool and had a tubular selvedge on one side.

This one has tubular selvedges on both sides, because why not?  It's in acrylic, yet again.  I'm pretty sure it's Red Heart this time, in a golden yellow color.


The pattern is small but kind of adorable.  It's band 1, p.103, from Tablet Woven Treasures by  Maikki Karisto and Mervi Pasanen, with two more tablets added to the right side to have tubular selvedges on both sides of the band.

This is my first time doing tubular selvedges.  Not that they are difficult or anything, but I simply haven't felt like doing a pattern that called for them yet.  I have to pull the weft snug enough to make sure the edges roll properly.  It's not perfect when the band is under tension.  But after the tension is off and the belt relaxes a bit, it looks fine.

This will make a good strap for something.  The edges are sturdy and the center is thin.  It's very three-dimensional.  It would make a perfectly reasonable belt, too.

If I were to do this again in the future, I might do 2-tablet tubular selvedges instead of 3-tablet.  And/or I might use more pattern cards for the center.  And/or maybe just go back to one tubular selvedge, or none.

What did I learn?

Tubular selvedges, I guess!  I hadn't done them before.  They're very similar to attached I-cord from knitting, so I wasn't particularly intimidated.  Indeed, they are very straightforward to do.  I don't have a preference between this and non-tubular selvedges.

I'm not sure what will be next.  I want to do another colorful Latvian-style 2-hole band.  But maybe I'll do something simple for a quick break.  Or maybe I'll succumb to another brick pattern.


Monday, January 16, 2023

Another Belt Pattern (2-hole)


Here's another belt from the Lautanauhat Facebook page (the people who did Applesies and Fox Noses and Tablet Woven Treasures), this one from a description in a post from  August 16, 2016.  Here is the link to the photo plus written description.  The pattern is described as a "medieval tablet woven band in wool."  It is a monochrome two-hole (or two-thread) pattern that is similar to the brick patterned belt I posted about roughly a week ago.

As usual, I substituted acrylic for wool for this first attempt.  It worked, but undoubtedly wool would have been better.  I really must start using wool instead of acrylic for tablet weaving.  I'll need to learn how to handle wool since everyone warns me that it's sticky, which I assume is a polite term about the threads trying to felt to each other from all the twisting.

The acrylic was rather stretchy.  My guess is that it's not Red Heart, which tends to be scratchier but less elastic.  Since I wove under tension, it'll be interesting to see if/how the band changes as it gets a chance to relax and I block it.  (Well, wet block it.  I know that synthetics don't truly change much unless one uses an iron to change their texture.)  I used the same acrylic for both warp and weft.

The band is pretty cute.  I do not like the reversals much.  They're too obvious and messy.  So...  for the next time I make this, I'll probably work out the twist and keep going forward.  If I flip the cards to reverse again, I'll try to space them out regularly and then put something on the belt in that area to hide or distract from the reversal, to make it seem intentional rather than messy.

I think it would be fun to use two different colors for this pattern to make another series of horizontally-striped bands, this time in 2-hole tablet weaving rather than simple inkle weaving.

I take rather terrible photos, alas.  The weaving is actually consistent (horizontally and vertically) except for the little bloops at the reversals.  Any weirdness is due to a quick photo taken with the band not being carefully flattened and posed and my shadow (of course) in the photo.  That's true for most of the photos I take, alas.

What did I learn?

I like two-hole patterns.  I like these simple belt patterns.  I like brick patterns (which are two-hole patterns that I am using to make belts).  I like a lot of these little throwaway patterns in the Lautanauhat Facebook page (in addition to their fabulous gift patterns, of course).  There are several more of them, often simple little belts and cords and the like that have only a brief written description to go along with the photo or video.  I'm happy that I can work with the description and don't necessarily need a charted pattern.

I don't like flipping tablets.  I don't like reversals that are done merely for the purpose of removing and reversing built-up twist.  I am fine with reversals for other purposes, of course, including historical accuracy as well as for pattern-development purposes.

I used my regular cards (from Robin & Russ Handweavers, so you know they're old/vintage!) since I didn't have enough of the little ones.  They work fine, of course.  I kind of prefer the little ones so I'll have to see if I can find a source for more.

The cats slept through most of this band so weren't available to act as weaving assistants.

What's next?  More two-hole and/or more belt patterns, possibly.  Or maybe something simpler.  We'll see.  I'm eyeing some straightforward diagonal-ish patterns, but also thinking that one of those threads can clearly be removed, with a contrasting color used for the weft to highlight the missed hole.  As usual, we'll see.


Saturday, January 14, 2023

Small Estonian Style Band (2-hole)

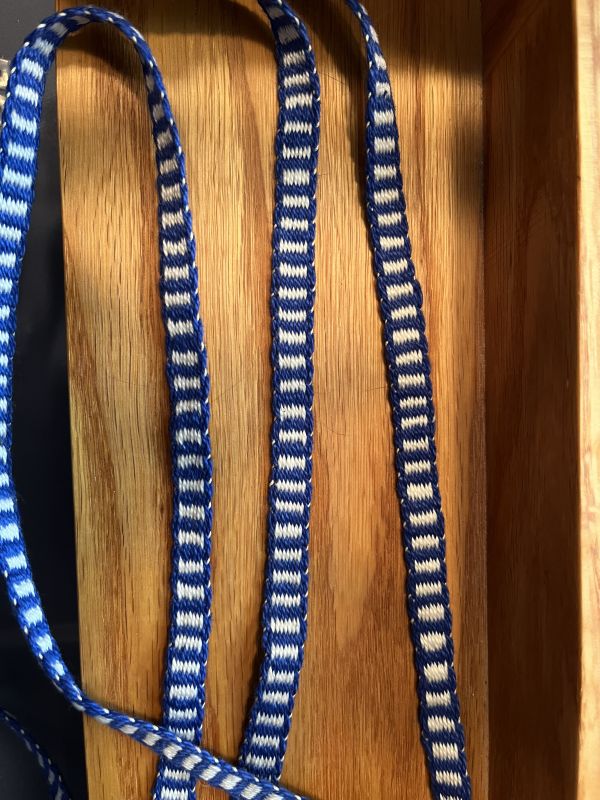
I have been admiring this little pattern for a long time.  So finally I decided it was time to do it -- a 2-hole (or 2-thread) pattern in the style of those narrow Estonian/Latvian/etc. bands.  This one has 6 pattern cards, and 2 edge cards on each side.


The draft is from the Lautanauhat/Tablet Weaving Facebook page.  They posted this pattern in March, 2016.  I think this is the link, though I don't know what will happen for those who avoid Facebook.  I don't see it posted elsewhere, though I haven't looked too hard yet.  They call it a "small Estonian style pattern."

Mine isn't nearly as cute or well-done as theirs, but that's OK.  I used leftover crochet cotton, probably #10 or so.  The weft is also white, probably #30 crochet cotton.  I gambled on the purple being dark enough to show up well against the white, but in reality, the white is more obvious.  I still prefer the looks of the purple side.  On the reverse side, the white looks a bit fuzzy, no doubt partially due to the white weft and probably also the whole reverse-side reverse-twist thing (is that a thing in this technique?).

This was a lot of fun to weave!  The first repeat was a little rough, but then the internal logic of the pattern became clear, and the rest was fairly straightforward.  The ABCD labels on the tablets kept me where I needed to be and helped me get back on track when things got funny.

I wasn't able to beat it hard enough to make it as compact as the original pattern.  I tried dropping the weight a bit but it made little difference.  I did turn the edge tablets every time, and I've seen the warning that this will elongate the pattern.  Maybe next time I'll do the thing of only turning one edge at a time, except that I kind of like how compact and tightly twisted the edges look.  Maybe wool vs cotton plays a role, too?  Oh, well, I still like this a lot.

The band ended up being roughly 8-9 feet long and maybe 1/4 inch wide.  I did 8 full repeats and then 2/3 of the 9th repeat, to end at a good stopping point.

------------------

Cats are not terribly useful weaving assistants, though the one lying on my neck was less disruptive than the one sitting on the warp and the one playing with the skewer that was holding my tablets.

My warping process went like this:

1. Cut lots of warp yarn, trying to keep it under control so it doesn't tangle.

2. Untangle yarn.  Thread tablets.

3. Drop tablets.  Untangle yarn.

4. Set up everything and do my test run (4 turns forward, using skewers, to double-check orientation and threading).

5. Realize that all the cards are threaded backwards, since I had threaded them as if the side away from me was the beginning, when of course it was the side closest to me.

6. Dither for a few minutes about possibly just flipping and re-arranging the cards.  Decide to re-thread each card.  (I am SOOOO glad I did that.)

7.  Re-tension the tablets.  Play around with weights as if I'm Goldilocks with the three bears.  (This continued for the first two to three pattern repeats, when I finally decided I was OK with what I had.)  Re-do the pattern/orientation testing.

8. Start weaving.

9. Realize after about an inch that I've made grievous errors and I can't easily figure out where I am in the chart.  Undo the weft and return to zero.  Or rather, to the skewers, since they make a nice horizontal surface to start the band against.

10. Start weaving, take two.

I used a bamboo skewer through one of the corner holes on the tablets after each turn so that they didn't rotate or flip or otherwise get frisky.  That proved to be both easy and very helpful.  The skewer went into the upper hole closest to me on the first turn of the 2-turn pair of turns, and the upper hole farthest from me on the second.  I think it really helped to ritualize as much as possible so I would be less likely to make mistakes if I lost concentration, or a cat batted around my row marker, or whatever.

Having labeled cards also proved to be helpful -- I could tell at a glance where I was in the pattern (within reason) and also if the cards were where they needed to be.  I can sort of tell by looking at the thread and the band, but it takes more effort than glancing at the printed letters.

--------------------

Here is one of their blog posts (from the Swan River Crafts blog) where they talk about this style of pattern and how to create them.

Eva Sandermann Olsen has a bunch of these little motifs in her pdf booklet Tablet Weaving, p.36-37 along with how to create them.  I think this is a link to the pdf file.

Recently a band from Iceland in this style was posted in various places with re-created charts, including this version from Silvia Aisling Ungerechts' website.  She has other 2-hole patterns on her site.  The various people who post on the various Facebook and other tablet weaving forums have contributed other charts and patterns.

Claudia Wollny's Tablets at Work has a section on 2-hole patterns, though the patterns she included in the book are more elaborate than this narrower Estonian/Latvian style of band.  She too has instructions on how to make your own patterns.

-------------------

I'm very glad I decided to try this pattern.  Now I feel comfortable weaving these types of patterns.  I'm also very tempted to start creating my own designs in addition to using motifs created by others.

So....   what's next?  More of these adorable little 2-hole bands?  More 2-hole brick patterns?  Double-face?  An easy threaded-in pattern with minimal individual-card manipulation?  Back to the inkle or tape loom, or make a bunch of braids?  We'll see.

Wednesday, January 11, 2023

Brick-patterned belt (2-hole tablet-weaving)

Tablet-woven brick patterns have intrigued me for a while.  I like their texture.  There are some in Lautanauhat by Maikki Karisto, and more in Tablet Woven Treasures by Maikki Karisto and Mervi Pasanen.

I've also been eyeing the cute little 2-hole patterns with colorful designs that are all over the 'net.

Well!  Let's do it!  (We'll ignore the siren song of Double Face for a little while longer.  And 3/1 twill.  And Sulawesi.  And everything else.  Eventually.  Soon.  Really.)

So this is my first band doing a 2-hole technique.  It gives me a good introduction to working with 2 yarns/threads per tablet.  It's not that working with 2 threads per tablet is inherently difficult, but I often see the warning that tablet management can be tricky because the tablets want to turn partway rather than being well-behaved.

The brick pattern I chose is pattern 6, p.113, from Tablet Woven Treasures.  It looks like a good first pattern for this technique, and also I like it a lot.  It is based on a belt for carrying a wide bronze knife sheath, from a Finnish Iron Age cemetery

It has a mere 10 tablets, which is good, since I want to use the small tablets I was given last year, and I only have 10 of them.  It's all one color, warp and weft and everything.  It's made from "thick two-stranded S-plied wool", which is close enough to Red Heart acrylic for my purposes.  There's only turning forward, no reversals at all.  This is a problem for people who use inkle looms for their tablet weaving, but since I do warp-weighted weaving, it's no problem at all -- I take out the excess twist when I advance the warp and rehang the weights.  The tablet slant is a simple alternating S and Z.  Or / and \, if you'd prefer, since my current convention is to use SZ for charting based on thread slant, and /\ for charting based on tablet slant.  The chart I'm following uses tablet slant, and honestly, I like that better than charts with thread direction.

It has been mentioned that edge tablets can distort the weaving since there are 4 threads vs. the 2 threads in the center tablets.  The solution offered is to turn the edge card when the weft is going through from that side, and to not turn it when the weft is coming through from the other side (or vice versa).  Pattern 6 shows every card turning on every row, so that's what I'm gonna do.  Maybe I'll try something different for the next band.


Tablet management turned out not to be too bad.  I used a bamboo skewer.  I put it in the upper hole closest to me.  Throw the thread, turn the tablets, throw the thread.  Hang onto the pack, turn the tablets, replace the skewer, and repeat.  Every now and then I'd forget, and then, yeah, the tablets would spin like a children's toy.  Since I used the cheat of labeled tablets and had them all lined up before I began weaving, it was fairly straightforward to get them back to where they needed to be.

I enjoyed this project and I really like how it turned out.  The photo is of the unblocked band.  I do hope some of the irregularities will disappear after blocking.  Some of it, of course, is me -- slightly inconsistent width, mostly, along with what looks like a few errors where I caught (or didn't catch) a thread from the other side of the shed.  I can also tell where I advanced the warp -- there are some slight tension irregularities, either from differences in thread tension or from where I clamped the already-woven band or both.

The band is long enough to use as a belt, yay!  I have no idea how much take-up there was since I didn't measure too closely.  The width is somewhat less than 1" though wider than the 12mm of the original archaeologic artifact.  As usual with one-direction tablet-weaving, yarn lengths change by the end of the weaving as the twist either gets tighter or looser based on the tablet slant, plus there are textural differences in the differently-slanted tablets due to this tighter/looser effect.  Some of the irregularity in the weaving might be due to that, too.

I should make more of these, in various colors and various weights of thread/yarn.  Maybe I'll even try wool someday.  A lot of these brick patterns have different colors rather than all one color.  Those will be fun, too.

Next up is a different 2-thread pattern, a design in the Latvian tradition, in crochet cotton.  Tablet management will be a little more complicated, hmmm, since some tablets will turn forward and others backward.   I have more bamboo skewers and we'll see if that's enough.


Tuesday, January 10, 2023

A Few More Inkles

 Here are the rest of the bands I made with that last bit of leftover perl cotton.  There was only enough left to make one more band with horizontal stripes -- blue with white bars.  Then the rest of the thread stash made two narrower bands with vertical stripes.


One of the vertical-stripe bands has 4 ends of red, 3 of orange, 1 of dark gray, 3 of yellow, and 6 of pink.  Yes, asymmetric, but it looks good anyway.  I particularly like the 1 dark gray, which of course makes speckles rather than a vertical stripe.  The band is very cheerful.


The other vertical-stripe band has 2 ends of blue, 4 of white, and 6 of green.  Simple, narrow, asymmetric, yet also attractive.


The last remnants of the various colors are all less than 3 yards long.  I suppose they'll go into the braiding stash.  Or whatever I end up using short bits of yarn/thread for.

The bands in the photos are unblocked.  I did block them later -- soaked them in warm water, then either ironed them or hung them up to dry.  They look better, of course, but not so much that I'm going to add new photos to this blog.  Not yet, at least.

Now what?  More inkle weaving?  I can move on to another thread stash.  I can put heddles onto the Dundas inkle loom (a thrift store find) and use that for a few bands.

Or maybe it's time to do more tablet weaving.  I've been circling around various 2-thread patterns and double-face patterns.  Which shall I try first?


Saturday, January 7, 2023

Fill the Gap! (a 7-strand braid on a disk)


I don't remember who taught this to me or exactly when, but it was at least 20 and maybe up to 25 years ago, and the person was an internet correspondent who was in the UK.  I have no idea who she learned it from.  Since it's an example of one of the types of narrow wares I'm enthralled with, and since I recently taught a class about how to make it, I am putting this on my blog.

It's known as the Fill The Gap braid, which is an appropriate description of how it's made.  One uses some kind of disk (circular, square, etc.) with 8 slots and only 7 strands.  The braid is made by jumping a strand over 2 strands to fill the gap, i.e., the empty slot.  Repeat that same move (one strand jumps over two strands into the empty slot) until the braid is finished.  The braid can be done in either a clockwise or counterclockwise direction.  It's probably possible to switch directions mid-braid but I haven't worked out how to do it.

The Braid Society, a very worthy organization in general, has an elegant handout about this braid -- how to set it up, how to do it, ideas for future experiments.  The downloadable pdf file is here.  The pdf claims that it is based on a straw-plaiting pattern from the 1700s, but honestly, I have no idea what the real provenance is or what other variations of this braid exist from other cultures or times.  It can no doubt be made in the hand.  The disk version is nice because it clarifies the next move, the slots hold the tension, it can be put down and picked up easily, and it's very portable.

The Fill the Gap braid can be done by just about anyone who can follow directions, has sufficient hand-eye coordination, and can count to three (or even just two).  It can be taught or learned in less than 5 minute for most people.  It's kind of addictive because it's so simple and repetitive.  The resulting braid is attractive and useful.

Just about any kind of yarn/thread/etc. can be used for the strands.  Colors and textures can be mixed.  Just about anything can be used for the disk, though I tend to use mid-weight cardboard (i.e. a bit thicker than a cereal box).  When it wears out, I simply discard the disk and make another.  The disk can be wonky and it can be any size that works for your hands and eyes and braiding material.

Anyway, I taught some people how to make this a few months ago.  It has rippled outward, with my students teaching others and so on.  This makes me happy.

The photo show a few disks from the class.  Two of the disks have braids on them.  I'm pretty sure one is clockwise and one counterclockwise.  One is crochet cotton (sparkly!) and the other is generic worsted-weight acrylic yarn.  The two finished braids that are in the photo are older.  One is done from some old needlepoint wool tapestry yarn.  The other is mixed yarns, probably all synthetics, including yarns of different weights and at least one of which is some kind of novelty/fuzzy yarn.


Tuesday, December 27, 2022

A Few Inkles

I have been wanting to (a) use up my dwindling stash of perl weaving cotton, and (b) play around with stripes, and (c) do some quick things.

This meant that it was time to pull out my inkle loom.  I wanted to do simple horizontal stripes (i.e. bars), preferably in low-contrast colors.

Some of these are low contrast, I suppose!


I like them a lot.

It's been a long time since I've done any inkle bands.  As such, I'm not too surprised that my edges are uneven and my picks aren't necessarily consistent.

What I've learned -- I like these simple stripes!  I will continue to do them as long as I have enough thread for horizontal bars, which is probably around 2-3 more, and then I'll switch to vertical stripes for the last band.  Or I'll switch to some other thread completely, or even start doing wider and more complex inkle patterns.  We'll see!

I seem to like using #20 crochet cotton for the weft.  #30 is too fine, and #10 is OK but I still like #20 better.  So that's useful to have learned.  I feel like Goldilocks now.

It would have been fun to have done stripes with the opposite color for the edges, but I don't have enough thread to do that.  Oh, well.  That's what happens with stash-busting -- there's not enough left for new experiments.  Maybe I'll do that for some future projects, especially if I'm still enamored of these narrow bands with horizontal stripes.

Cats are not particularly useful weaving assistants, but they seem less able to cause mischief when I use an inkle loom than when I've been tablet weaving.

Inkle-loom bands are quick to warp up and quick to weave.  They are great for a little bit of near-instant gratification and low-attention-span weaving.

How I did these:  The color that I had the most of was used for the border, which consisted of 3 or 5 warps.  Then I alternated color 2 and color 1 until it looked like I was either out of color 2 or had just enough of color 1 left to do the other border.  For all of them, I think I ended up with 7 warps of color 2.

The above photos are straight off the loom.  I'm going to wet-finish them and will take new photos to share.  For wet finishing, I'll soak them in hot water, then get rid of most of the water by wrapping them in a towel, then ironing them and then letting them finish drying.

In the past year or two, a couple of other inkle looms serendipitously have come my way.  I'll need to play around with those, too.  The one I used for the above bands is my own home-made one that I've had for many years.  The person who made it used dimensions/instructions from Inkle Weaving by Helene Bress combined with images of a Schacht inkle loom.  It holds roughly 3 yards.  Of the others, one is a small 2-sided inkle loom, also home-made, given to me as a gift.  The other is a Dundas that I found for dirt-cheap in a thrift store.

I still want to do more tablet weaving soon, once I have space to set it up again.  A friend told me about a sale on ceramic fence insulators, so I might try using those as weights, one per card or so, the next time I warp up.  I'll load them up like kumihimo bobbins (described in Braids by Rodrick Owen) and see if it helps me with my warp control issues.

I also recently had some fun with disk braiding, and in particular, the Fill the Gap braid.  I ran a quick little course for beginning braiders back in November and we all had a lot of fun.  I'll do a new post about that soon-ish.