Tuesday, January 10, 2023

A Few More Inkles

 Here are the rest of the bands I made with that last bit of leftover perl cotton.  There was only enough left to make one more band with horizontal stripes -- blue with white bars.  Then the rest of the thread stash made two narrower bands with vertical stripes.


One of the vertical-stripe bands has 4 ends of red, 3 of orange, 1 of dark gray, 3 of yellow, and 6 of pink.  Yes, asymmetric, but it looks good anyway.  I particularly like the 1 dark gray, which of course makes speckles rather than a vertical stripe.  The band is very cheerful.


The other vertical-stripe band has 2 ends of blue, 4 of white, and 6 of green.  Simple, narrow, asymmetric, yet also attractive.


The last remnants of the various colors are all less than 3 yards long.  I suppose they'll go into the braiding stash.  Or whatever I end up using short bits of yarn/thread for.

The bands in the photos are unblocked.  I did block them later -- soaked them in warm water, then either ironed them or hung them up to dry.  They look better, of course, but not so much that I'm going to add new photos to this blog.  Not yet, at least.

Now what?  More inkle weaving?  I can move on to another thread stash.  I can put heddles onto the Dundas inkle loom (a thrift store find) and use that for a few bands.

Or maybe it's time to do more tablet weaving.  I've been circling around various 2-thread patterns and double-face patterns.  Which shall I try first?


Saturday, January 7, 2023

Fill the Gap! (a 7-strand braid on a disk)


I don't remember who taught this to me or exactly when, but it was at least 20 and maybe up to 25 years ago, and the person was an internet correspondent who was in the UK.  I have no idea who she learned it from.  Since it's an example of one of the types of narrow wares I'm enthralled with, and since I recently taught a class about how to make it, I am putting this on my blog.

It's known as the Fill The Gap braid, which is an appropriate description of how it's made.  One uses some kind of disk (circular, square, etc.) with 8 slots and only 7 strands.  The braid is made by jumping a strand over 2 strands to fill the gap, i.e., the empty slot.  Repeat that same move (one strand jumps over two strands into the empty slot) until the braid is finished.  The braid can be done in either a clockwise or counterclockwise direction.  It's probably possible to switch directions mid-braid but I haven't worked out how to do it.

The Braid Society, a very worthy organization in general, has an elegant handout about this braid -- how to set it up, how to do it, ideas for future experiments.  The downloadable pdf file is here.  The pdf claims that it is based on a straw-plaiting pattern from the 1700s, but honestly, I have no idea what the real provenance is or what other variations of this braid exist from other cultures or times.  It can no doubt be made in the hand.  The disk version is nice because it clarifies the next move, the slots hold the tension, it can be put down and picked up easily, and it's very portable.

The Fill the Gap braid can be done by just about anyone who can follow directions, has sufficient hand-eye coordination, and can count to three (or even just two).  It can be taught or learned in less than 5 minute for most people.  It's kind of addictive because it's so simple and repetitive.  The resulting braid is attractive and useful.

Just about any kind of yarn/thread/etc. can be used for the strands.  Colors and textures can be mixed.  Just about anything can be used for the disk, though I tend to use mid-weight cardboard (i.e. a bit thicker than a cereal box).  When it wears out, I simply discard the disk and make another.  The disk can be wonky and it can be any size that works for your hands and eyes and braiding material.

Anyway, I taught some people how to make this a few months ago.  It has rippled outward, with my students teaching others and so on.  This makes me happy.

The photo show a few disks from the class.  Two of the disks have braids on them.  I'm pretty sure one is clockwise and one counterclockwise.  One is crochet cotton (sparkly!) and the other is generic worsted-weight acrylic yarn.  The two finished braids that are in the photo are older.  One is done from some old needlepoint wool tapestry yarn.  The other is mixed yarns, probably all synthetics, including yarns of different weights and at least one of which is some kind of novelty/fuzzy yarn.


Tuesday, December 27, 2022

A Few Inkles

I have been wanting to (a) use up my dwindling stash of perl weaving cotton, and (b) play around with stripes, and (c) do some quick things.

This meant that it was time to pull out my inkle loom.  I wanted to do simple horizontal stripes (i.e. bars), preferably in low-contrast colors.

Some of these are low contrast, I suppose!


I like them a lot.

It's been a long time since I've done any inkle bands.  As such, I'm not too surprised that my edges are uneven and my picks aren't necessarily consistent.

What I've learned -- I like these simple stripes!  I will continue to do them as long as I have enough thread for horizontal bars, which is probably around 2-3 more, and then I'll switch to vertical stripes for the last band.  Or I'll switch to some other thread completely, or even start doing wider and more complex inkle patterns.  We'll see!

I seem to like using #20 crochet cotton for the weft.  #30 is too fine, and #10 is OK but I still like #20 better.  So that's useful to have learned.  I feel like Goldilocks now.

It would have been fun to have done stripes with the opposite color for the edges, but I don't have enough thread to do that.  Oh, well.  That's what happens with stash-busting -- there's not enough left for new experiments.  Maybe I'll do that for some future projects, especially if I'm still enamored of these narrow bands with horizontal stripes.

Cats are not particularly useful weaving assistants, but they seem less able to cause mischief when I use an inkle loom than when I've been tablet weaving.

Inkle-loom bands are quick to warp up and quick to weave.  They are great for a little bit of near-instant gratification and low-attention-span weaving.

How I did these:  The color that I had the most of was used for the border, which consisted of 3 or 5 warps.  Then I alternated color 2 and color 1 until it looked like I was either out of color 2 or had just enough of color 1 left to do the other border.  For all of them, I think I ended up with 7 warps of color 2.

The above photos are straight off the loom.  I'm going to wet-finish them and will take new photos to share.  For wet finishing, I'll soak them in hot water, then get rid of most of the water by wrapping them in a towel, then ironing them and then letting them finish drying.

In the past year or two, a couple of other inkle looms serendipitously have come my way.  I'll need to play around with those, too.  The one I used for the above bands is my own home-made one that I've had for many years.  The person who made it used dimensions/instructions from Inkle Weaving by Helene Bress combined with images of a Schacht inkle loom.  It holds roughly 3 yards.  Of the others, one is a small 2-sided inkle loom, also home-made, given to me as a gift.  The other is a Dundas that I found for dirt-cheap in a thrift store.

I still want to do more tablet weaving soon, once I have space to set it up again.  A friend told me about a sale on ceramic fence insulators, so I might try using those as weights, one per card or so, the next time I warp up.  I'll load them up like kumihimo bobbins (described in Braids by Rodrick Owen) and see if it helps me with my warp control issues.

I also recently had some fun with disk braiding, and in particular, the Fill the Gap braid.  I ran a quick little course for beginning braiders back in November and we all had a lot of fun.  I'll do a new post about that soon-ish.


Wednesday, February 23, 2022

Another Band Done (Diagonals-type pattern)

 And it's done.  I am pleased.


I ended up with about 42 repeats (at 16 turns per repeat), about 160 cm long (64-ish inches), about 3 cm wide (1.25-ish inches).  There was about 4-5" of waste at the beginning and about 9-12" at the end.  I might have been able to eke out one more repeat, but decided that it was too aggravating.  The last few repeats were already aggravating and didn't look as clean and even as earlier in the band.  I can't remember how long my initial warp was, but I think it was in the 2 meter range.  It was probably a bit longer than that if I assume that take-up was roughly 10-20%.

The above photo shows more or less what it looks like.  I think it's striking even with the imperfections.  I have no idea what I'll use it for!  I will need to sew it to something, though, since in a few places near the beginning, the weft is showing on the bottom of the band.  I think it was either near where I was unweaving a mistake or when I was catching bottom threads above the shed and hadn't realized it yet.

By the end of the band, I'd gotten into a nice rhythm.  I'd make this again, probably with 28 rather than 24 cards.  I'd love to get some plastic cards in different colors to make it easier to move cards into the proper packs (forwards vs backwards).  I counted carefully with the monochrome cards, and that was a wise thing to have done.

Things I learned:  Well, I already wrote about the main thing.  It's important to clear the shed properly.  Otherwise, you risk catching the lower threads in the upper part of the shed, and that affects the clean diagonal lines of the pattern.

I tried using chip clips to hold the warp after the warp got too short to handle in my usual way, which is to tie all of it into a knot and hang the half-full gallon milk jug from the knot.  The chip clips were so-so.  Sometimes they'd hold the tension and sometimes threads would slip.  It did keep the threads separated so that the cards were able to turn even in the fairly tight space that was left as I neared the end of the band.

I like doing diagonal-type patterns.  They're pretty straightforward and very satisfying.  Using multiple packs requires a bit more room than one-pack patterns, but that's OK.  It might be easier to do a few more repeats with smaller cards.

On to the next pattern!  Whatever shall it be?  I guess I'll find out when Inspiration strikes.


Tuesday, January 25, 2022

Fun with Diagonals

I am finally weaving a band that I warped up well over a year ago.  Hmm, well over two years ago, but all of my weaving stuff was in boxes in storage for at least a year of that.

The pattern is from Peregrina1 (that's her user name on Ravelry).  She posted a photo of a lovely band and was kind enough to share the pattern.  It's a diagonals-type pattern.  I didn't have the same colors she used (which are extremely attractive).  I picked colors from what I did have, making sure that the contrast color was indeed contrast-y.  I think I made a reasonable choice from what I had available.

I'm having fun with it.  It felt most comfortable to use my PVC loom, so that's what I'm doing.  I did have to track down all the pieces and remember how to put it together.  Storage, boxes, etc.


This photo shows a few pattern repeats.  You can see the white PVC of the loom and the skewers I used at the start of the band to make sure I've threaded things properly.  The perspective is a bit funky -- the band is relatively consistent in width, honest!

What am I learning?

Well, I'm getting lots more practice with unweaving.  If I'm distracted or tired, it's easy to rotate some cards forward instead of backward and not notice for an inch or so.

I'm also getting yet more reminders that it's important to watch the shed.  It's apparently very easy for me to catch bottoms threads into the top part of the shed without noticing, especially from one of the interior packs of cards.  That became very obvious when I was unweaving.  I think that's part of why the line of the pattern isn't always perfectly clear -- a thread from the lower shed is on the surface next to the proper top threads, rather than remaining properly on the backside, and thus obscuring things.  Or some of that may end up easing out when I block/finish the band -- we'll see.  Or some of it might be due to slight differences in thread tension and shed-beating, leading to slight differences in the lengths of the floats.  I don't know but I'll try to get it figured out and then do my best to improve.

I used the thread that was already on my shuttle as weft.  I like that it's thin -- it looks like #30 crochet cotton, perhaps #20.  But it is white or off-white, and it does show along the edge and sides.  I probably should have chosen something closer in color to the edge threads.  In general, the edges aren't perfect and the width isn't perfectly consistent, but given how long it's been since I've done much, I'm not gonna beat myself up about it.

I love how the pattern is built in sections -- each group of four cards is 8F8B, but each group is staggered by four rows from the adjacent group of four cards.  The outer two groups are 2 cards since the pattern is on 24 cards instead of 28, and I wanted it to be symmetric.  There are also 2 more cards at each side as edge cards, which are all blue, alternating SZ or ZS, and only turned forwards.  I'm using the two-packs method of keeping things straight -- the forward pack and the backwards pack, re-arranged every four turns.

I love how these complex-looking designs arise from such simple rules.  These kinds of bands end up being twist-neutral, too, without needing to reverse the weaving or work out extra twist or anything like that.  And obviously the forward-back turnings can be different  -- 6F6B, or 4F2B2F4B, etc. -- or the groups of cards can be offset by two rows rather than four, etc.

Not every diagonals pattern is like this, or at least I don't think they are, but a lot of the ones I find attractive are.  They also tend to be fairly easy to weave since they're made from such simple building blocks.

The cats, surprisingly, aren't as terrible about helping as they were several years ago.  They watch, but mostly they're content to chew on the wooden skewers at the beginning of the band or to bat around the warp that's hanging off the back end of the loom.  Sometimes they like to sit so they have a close view of the shed when I'm unweaving, making it tricky to determine what is a thread and what is a cat whisker.  One cat likes to lie on my neck, along my shoulders, as I weave, but that's not too big a deal.

I have no idea what I will use the band for, if anything.


Wednesday, January 12, 2022

Back to the Classics: Sample Band A (Candace Crockett)

Back in the day, before the internet connected us, there was Candace Crockett's book, Card Weaving.  First published in 1973 and revised in 1991, it was a good-for-its-time, easily available introduction to tablet weaving.  It was the first book I owned on the subject -- I received it as a gift along with a hand-made shuttle from a woodworking-minded person in my life.  I toddled down to Robin & Russ Handweavers to buy cards (and Russell Groff's booklet, of course), and that's how I began.

Candace Crockett's book introduces the techniques of card-weaving with Sample Band A.  I thought it was ugly, so I started with something else.  I can't remember -- all the evidence is thankfully long gone.

However, I finally got a chance to weave it!

Several weeks ago, I participated in a class, my first.  I was looking forward to seeing how Real Weavers, who had Experience, did things.  (I was not disappointed -- I learned a lot!)

The class was aimed at beginners, and to my surprise (and pleasure), we did Sample Band A.  Not that the teacher referred to it as such, but I recognized it immediately!

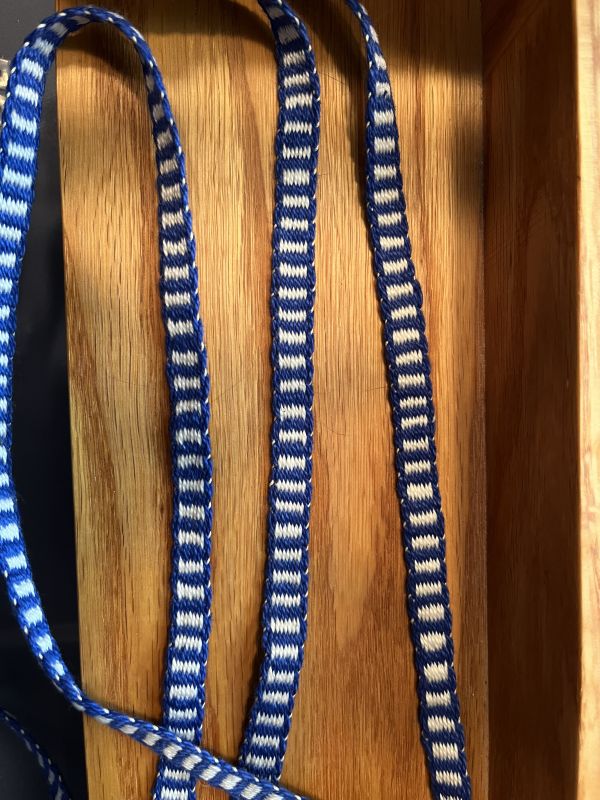
Sample Band A has 10 cards, all with the same orientation.  It is a threaded-in pattern with three colors, and a straightforward 4F-4B turning sequence.

I was given already-threaded tablets with perle cotton in red, white, and blue.  OK, the white is a light gray and the other two colors are muted rather than garish.  The warp is probably carpet warp, a dark green that blends in unobtrusively with the blue.

The loom was another draw for me -- it consisted of a plank (probably a 2x6) about 4 feet long, with 2 dowels (about an inch or so in diameter, maybe 4" in length) that are probably glued into drilled holes, one at each end.  It's simple and portable.  We tied each end of the warp to a dowel and off we went.  It was pretty simple to advance the warp and also to maintain a comfortable weaving tension.  We even got to take our looms home!  I will try to add a photo of it at some point.

The tablets I was given were about 2.25" square, made from cardboard, very comfortable to use.

I must admit that the woven tablet looks nicer than I expected.  I suspect Ms. Crockett used the yarn/thread she did so that the details would be obvious, and that's part of why the band photographed in the book looks so ugly.

In case it's not obvious, the side with the red squares is the right side, and the side with the white crosses is the wrong side.  Both are pleasant.


I haven't measured it precisely, but I think I have about 5 yards of this, and it's roughly 1/2" wide.  I haven't done anything to the ends, either, since I have no idea what I will do with the band.  Assuming the thread is color-fast when wet, I'll probably block this and possibly even iron it.

I feel a bit chuffed (in a good way) that I finally made this band.  It is SOOOOO common as a first band done by tablet weavers of a certain place and time.  I feel like I am participating in some kind of ritual or tradition, connecting me with the decades-old community of English-language tablet weavers who started with Card Weaving by Candace Crockett.

Candace Crockett's Card Weaving Drafting Conventions

Ms. Crockett uses her own style of charting the patterns, which can cause confusion as people start to use other people's patterns.  This is not a problem when weaving in isolation, of course.  However, it's always good to understand what someone's charting conventions are and how they compare to other charting conventions.

Crockett uses arrows to indicate card direction.  Her arrows indicate which way the threads go when you are threading the cards  After looking at her diagrams and photos (figures 3-4, 3-5, 4-9, and 4-10, in conjunction with various photos), her left arrow <--- corresponds to S threading, which is equivalent to / if you go by tablet orientation.  Her right arrow ---> corresponds to Z threading, which is equivalent to \ for tablet orientation.  I'm pretty sure that's how it is, though after a while I can confuse myself.

Her tablets are labeled clockwise ABCD, facing to the left.  (This is the same as counterclockwise ABCD facing to the right, I believe).  She starts with the AD line on top.  She numbers her cards from left to right, and her chart goes from top (A) to bottom (D).

When she specifies turning forward and backward, for her, forward is towards the weaver and back is away.  I usually do the opposite (forwards is away from me, towards the unwoven warp, and backwards is towards me, towards the already woven band).  So this was kind of interesting to realize -- if I once knew this, it's long been forgotten.

So, all in all, this was a useful little band to weave.  I now have a new loom, which was a type I'd not woven on before.  It is similar to setting up two C-clamps but looks a little nicer, is more portable, and is better designed for handling long warps.  I got to weave Sample Band A, that old classic, and also look at my old copy of Card Weaving to see how Candace Crockett's weaving conventions compare to other styles.  And I learned a lot by watching and chatting with a veteran tablet-weaver with decades of experience.

I don't really use Candace Crockett's Card Weaving much these days.  With the internet and the easier availability of international books, I find other materials to be more useful.  I'm glad I had an excuse to revisit her work.

-------------

I haven't posted in quite a while!  Life's been busy.  Hopefully I'll have a few more bands and what-not posted here before this blog goes quiet again.  We'll see.

For tablet weaving, I have a diagonals band warped up and ready to weave once I can set up an area in which to weave where the cats can't do too much damage.  After that, I plan to dive into some double-face, missing-thread, and then 3/1 twill and Sulawesi.  Plus more diagonals (which to me includes kivrim-style patterns), maybe pebble weave, and anything else that interests me.  We'll see!  I have plenty of cards and more than one loom, so maybe it's time to start having multiple concurrent projects.  That way lies madness, though.


Wednesday, April 4, 2018

The S-Sign Band

In my previous post, I was thinking about the balanced/offset diagonal-type pattern, where the tablets have a balanced X-forward/X-back turning pattern, but some of the tablets are offset in where they begin the turning pattern.

I had mentioned the S-sign band from Applesies and Fox Noses as being in this style.  It has 6 tablets for the main pattern plus 3 for each edge/border, for 12 total.

So I warped it up and wove it, using Aunt Lydia's #10 crochet cotton in purple and white.


I ended up with close to 6' of finished band.  I'm not sure how much I started with, so I don't know how much take-up there was.  I had about 10" or so of waste on each end.  The band itself is roughly 1/2" wide.

The weft was some thinner white crochet cotton from the leftover crochet cotton stash.

The weaving was quite straightforward.  My edges are reasonably straight and the weft-spacing is reasonably consistent.  Not perfect, but reasonable.


Applesies and Fox Noses Drafting Conventions:

Tablet orientation is shown (instead of thread orientation).

The AD line is at the top when starting.

Tablets are numbered from left to right.

Tablets face right.

Tablets are labeled in a counter-clockwise direction when facing right.


Things I learned:

I need a better way of handling long warps.  I keep getting them all tangled.

Cats are not very good assistants if one's goal is to untangle a bunch of cotton threads.

I was trying to do this backstrap-style.  But I got too frustrated with the warp threads since they kept tangling and I couldn't get the tension to be even.  Eventually I just transferred it to a warp-weighted loom.  I untangled the first few feet of the warp, added some weight, and was able to get the tension even enough.  So I guess I'll do backstrap-style weaving with some other band.

Instead of working out the extra twist in border cards continuously turned forward, I flipped them around their vertical axis every now and then.  (This gives the same effect as turning them backwards.)  I think I prefer to work out extra twist or to honestly start turning them backwards.  Flipping was OK but a bit fiddly.

For whatever reason, this was the first time I noticed that Applesies and Fox Noses has the cards labeled in a counter-clockwise instead of a clockwise direction.  Oh, well!  I just re-arranged cards instead of re-threading them.


I'm not sure what band I'll do next.  I still want to do a double-face sampler plus there are a few diagonal-type patterns I'd like to do.  Or maybe I should blather on about braiding for a while.  Or inkle-type band weaving.  We'll see!